Quantcast
Channel: Containers Archives - CormacHogan.com
Viewing all 78 articles
Browse latest View live

docker-machine driver plugin for Photon Controller

$
0
0

docker-machineIn previous posts we have looked at using a “cluster”  for deploying docker swarm on top of photon controller. Of course, deploying docker swarm via the cluster management construct may not be what some customers wish to do, so now we have full support for “docker-machine” on photon controller as well. This will allow you to create your own docker swarm clusters using instructions provided by Docker. In this post, we will look at getting you started with building the docker-machine driver plugin, setting up Photon Controller, and then the setup needed to allow the deploying of docker-machine on Photon Controller.

You can find the software and additional information on github.

*** Please note that at the time of writing, Photon Controller is still not GA ***

Step 1 – Prep Ubuntu

In this scenario, I am using Ubuntu VM. There are the commands to prep that distro for the docker-machine driver plugin for photon controller:

apt-get update
apt-get install docker.io      => install Docker
apt-get install golang         => Install the GO programming language
apt-get install genisoimage    => needed for mkisofs

Step 2 – Build docker-machine and the docker-machine driver plugin

 Download and build the photon controller plugin for docker-machine. You can do this by first setting the environment variable GOPATH, and then running “go get github.com/vmware/docker-machine-photon-controller”. I simply set GOPATH to a newly created directory called /GO, cd /GO and then running the go get.

Once the code is downloaded, change directory to the “src/github.com/vmware/docker-machine-photon-contoller” directory and then run the “make build” command. This creates the binary in the bin directory. Finally run the command “make install” which copies the binary to the /usr/local/bin directory.

Next step is to build the docker-machine binary. The source has been pulled down earlier with the go get command, but you will need to change directory to “src/github.com/docker/machine” and run “make build” and “make install”.

Note that you do not run the docker-machine-photon-controller binary directly. It is called when the “docker-machine create” command with -d option is run, which you will see shortly. Verify that the “docker-machine” is working by running it and getting the “usage” output.

Step 3 – Get Photon Controller ready

You have to do the usual stuff with Photon Controller, such as creating a tenant, project, image, and so on. I won’t repeat the steps here as they have been covered in multiple posts already, such as this one here on Docker Swarm. The image I am using in this example is Debian 8.2 which you can get from the bintray here. There are some additional steps required for docker-machine, and these are the requirement to have disk and VM flavors. These are the flavors I created:

> photon flavor create -k vm -n DockerFlavor -c 
"vm 1.0 COUNT, 
vm.flavor.core-100 1.0 COUNT, 
vm.cpu 1.0 COUNT, 
vm.memory 2.0 GB, 
vm.cost 1.0 COUNT"

> photon flavor create -k ephemeral-disk -n DockerDiskFlavor -c 
"ephemeral-disk 1.0 COUNT, 
ephemeral-disk.flavor.core-100 1.0 COUNT, 
ephemeral-disk.cost 1.0 COUNT"

Note the names of the flavors, as we will need to reference these shortly. OK. We’re now ready to create a docker-machine on this photon controller setup.

Step 4 – Setup ENV, get RSA key, create cloud-init.iso

Back on my Ubuntu VM, I need to set a bunch of environment variables that reflect my Photon Controller config. These are what I need to set up:

export PHOTON_DISK_FLAVOR=DockerDiskFlavor
export PHOTON_VM_FLAVOR=DockerFlavor
export PHOTON_PROJECT=a1b993e6-3838-43f7-b4fa-3870cdc0ea76
export PHOTON_ENDPOINT=http://10.27.44.34
export PHOTON_IMAGE=21a0cbf6-5a03-4d2c-919c-ccf6ea9c432b

The Photon Project and the Photon Image both need the ids. Also note that there is no port provided to the endpoint, it is simply the IP address of the photon controller that is provided.

The next part of the config is to decide if you are going to use the default SSH credentials, or create your own. If you wish to use the default, then simply add two new environment variables:

export PHOTON_SSH_USER=docker
export PHOTON_SSH_USER_PASSWORD=tcuser

However if you wish to add your own credentials for SSH, first create a public/private RSA key pair. To do that, we use the following command:

$ ssh-keygen -t rsa -b 4096 -C "chogan@vmware.com"
Generating public/private rsa key pair.
Enter file in which to save the key (/home/cormac/.ssh/id_rsa): 
Created directory '/home/cormac/.ssh'.
Enter passphrase (empty for no passphrase): 
Enter same passphrase again: 
Your identification has been saved in /home/cormac/.ssh/id_rsa.
Your public key has been saved in /home/cormac/.ssh/id_rsa.pub.
The key fingerprint is:
SHA256:efcA0/SH6mKkrMkGeOjfsdNtct/2Aq01K1nmdOffbz8 chogan@vmware.com
The key's randomart image is:
+---[RSA 4096]----+
|            .    |
|           o . . |
|          o . o .|
|         . o . . |
|   o    S o +.   |
|  o o  . + o.oB o|
| . . ...o.o .X.=.|
|  .  oo=o.+.+.=E+|
|   ...*. + ..o.+@|
+----[SHA256]-----+

This creates a  public key in /home/cormac/.ssh/id_rsa.pub. Once this is created, we need to set an environment variable to point to it:

export PHOTON_SSH_KEYPATH=/home/cormac/.ssh/id_rsa

The other place that this information is needed is in a “user-data.txt” file. This is what the user-data.txt file should look like. Simply replace the “ZZZZ” in the ssh-rsa line with the RSA public key that you created in the previous step.

#cloud-config
 
groups:
  - docker
 
# Configure the Dockermachine user
users:
  - name: docker
    gecos: Dockermachine
    primary-group: docker
    lock-passwd: false
    passwd:
    ssh-authorized-keys:
      - ssh-rsa ZZZZZZZZZZZZZZZZZZZZZ == chogan@vmware.com
    sudo: ALL=(ALL) NOPASSWD:ALL
    shell: /bin/bash

Now that we have the “user-data.txt” file, we are going to create our own ISO image. This ISO image is used for the initial boot of any VM deployed on Photon, and it then picks up the image (in our example the Debian image) to boot the VM. This is why we downloaded the mkisofs tool earlier.

mkisofs -rock -o cloud-init.iso user-data.txt

Now we need to add an additional environmental variable to point to this cloud-init.iso.

export PHOTON_ISO_PATH=/home/cormac/docker-machine/cloud-init.iso

Now if we examine the full set of environment variables for Photon, along with our own SSH and cloud-init.iso, this is what we should see:

PHOTON_DISK_FLAVOR=DockerDiskFlavor
PHOTON_VM_FLAVOR=DockerFlavor
PHOTON_ISO_PATH=/home/cormac/docker-machine/cloud-init.iso
PHOTON_SSH_KEYPATH=/home/cormac/.ssh/id_rsa 
PHOTON_PROJECT=a1b993e6-3838-43f7-b4fa-3870cdc0ea76 
PHOTON_ENDPOINT=http://10.27.44.34 
PHOTON_IMAGE=0031278e-f53e-4081-9937-8ccea68c61dd

OK. Everything is in place. We can now use docker-machine  to deploy directly to Photon Controller.

Step 5 – Deploy the docker-machine

Now it is just a matter of running docker-machine with the create command and using the -d photon option to specify which plugin to use. As you can see, the ISO is attached to the VM to do the initial boot, and then our Debian image is used for the provisioning:

$ docker-machine create -d photon chub004
Running pre-create checks...
Creating machine...
(chub004) VM was created with Id:  af1ea29a-0323-4cbb-8845-37de1123a4b2
(chub004) ISO is attached to VM.
(chub004) VM is started.
(chub004) VM IP:  10.27.34.29
Waiting for machine to be running, this may take a few minutes...
Detecting operating system of created instance...
Waiting for SSH to be available...
Detecting the provisioner...
Provisioning with debian...
Copying certs to the local machine directory...
Copying certs to the remote machine...
Setting Docker configuration on the remote daemon...
Checking connection to Docker...
Docker is up and running!
To see how to connect your Docker Client to the Docker Engine \
running on this virtual machine, run: docker-machine env chub004

Now you can query the machine:

$ docker-machine env chub004
export DOCKER_TLS_VERIFY="1"
export DOCKER_HOST="tcp://10.27.34.29:2376"
export DOCKER_CERT_PATH="/home/cormac/.docker/machine/machines/chub004"
export DOCKER_MACHINE_NAME="chub004"
# Run this command to configure your shell: 
# eval $(docker-machine env chub004)
cormac@cs-dhcp34-25:~$ 

OK – so we have successfully created the machines. The next step will be to do something useful with this such as create a docker SWARM cluster. Let’s leave that for another post. But hopefully this will show you the versatility of Photon Controller, allowing you to deploy machines using the docker-machine command.

By the way, if you are attending DockerCon in Seattle next week, drop by the VMware booth where docker-machine on Photon Controller will be demoed.

The post docker-machine driver plugin for Photon Controller appeared first on CormacHogan.com.


Compare and Contrast: Photon Controller vs VIC (vSphere Integrated Containers)

$
0
0

PHOTON_square140As many regular reader will be aware, I’ve been spending a lot of time recently on VMware’s Cloud Native App solutions. This is due to an internal program available to VMware employees called a Take-3. A Take-3 is where employees can take 3 months out of their current role and try a new challenge in another part of the company. Once we launched VSAN 6.2 earlier this year, I thought this would be an opportune time to try something different. Thanks to the support from the management teams in both my Storage and Availability BU (SABU) and the Cloud Native Apps BU (CNABU),  I started my Take-3 at the beginning of May. This is when my CNA articles on VIC (vSphere Integrated Containers) and Photon Controller first started to appear. Only recently I was asked an interesting question – when would I use VIC and when would I use Photon Controller? That is a good question, as both products enable customer to use containers on VMware products and solutions. So let me see if I can provide some guidance, as I asked the same question from some of the guiding lights in the CNABU.

When to use VIC?

Lets talk about VIC first, and why customer might like to deploy container workloads on VIC rather than something like “container in a VM”. Just to recap, VIC allows customers to run “container as a VM” in the vSphere infrastructure, rather than “container in a VM”. It can be deployed directly to a standalone ESXi host, or it can be deployed to vCenter Server. This has some advantages over the “container in a VM” approach.

Reason 1 – Efficiency

Consider an example where you have a VM which runs a docker daemon and launches lots of containers. Customers will now connect to these containers via docker client. Assume that over a period of time, this VM uses up a significant mount (if not all) of its memory for containers and eventually these containers are shutdown. This does not allow the memory consumed by the VM on behalf of the containers go back into a shared pool of memory (on the hypervisor where the VM is run) for other uses. With VIC, since we are deploying containers as VMs and using ESXi/hypervisor memory resource management, we do not have this issue. To think of this another way:- containers are potentially short-lived, whereas the “container host” is long-lived, and as such can end up making very inefficient use of system resources from the perspective of the global pool.

Now there is a big caveat to this, and it is the question of container packing and life-cycle management. If the container host VMs are well-packed with containers, and you also have control over the life-cycle of the container host, then it can still be efficient. If however there is no way to predict container packing on the container host and if over-provisioning is the result, and you also have no control over the life-cycle of the container host, then you typically don’t get very good resource efficiency.

Reason 2 – Muti-tenancy

There is no multi-tenancy in Docker. Therefore if 50 developers all requested a “container” development environment, a vSphere admin would have to deploy 50 Virtual Machines, one per developer. With VIC, we have the concept of a VCH (Virtual Container Host) which controls access to a pool of vSphere resources. A VCH is designed to be single-tenant, just like a Docker endpoint. Both present you with a per-tenant container namespace. However, with VIC, one can create very many VCHs, each with their own pool of resources. These VCH (resource pools), whether built on a single ESX host or vCenter Server, can be assigned to individual developers.

One could consider now that the vSphere admin is doing CAAS – Containers as a Service.

The 50 developers example is as much about efficiency as it is about tenancy – the fact that you can only have one tenant per container host VM will force you down a path of creating a large silo composed of 50 container host VMs. In the case where we’re comparing ESXi with Linux on the same piece of hardware to run container workloads, ESXi has a big advantage in that you can install as many VCHs as you like.

Reason 3 – Reducing friction between vSphere/Infra Admin and developer

On the main goals of VIC was basically not to have the developer worry about networking and security infrastructure with containers. This particular reason is more about how VIC informs and clarifies the boundaries between the vSphere admin and the developer. To put it simply, a container host VM is like a mini-hypervisor. Give that to a developer and they’re then on the hook for patching, network virtualization, storage virtualization, packing etc. within the container host. The container host is then also a “black box” to the infra folks which can lead to mistakes being made. E.g. “Only certain workloads are allowed on this secure network”. The secure network is configured at the VM level. If the VM is a container host, its hard to control or audit the containers that are coming up and down in that VM and which have access to that secure network.

VIC removes any infra concerns from the consumer of a VCH and allows for much more fine-grained control over access to resources. With VIC, each container gets its very own vNIC.A vSphere admin can also monitor resources that are being consumed on a per container basis.

There is one other major differentiator here with regards to the separation of administrator and developer roles which relates to compliance and auditing tools, and a whole list of process and procedures they have to follow as they run their data center. Without VIC developers end up handing over large VMs that are essentially black boxes of “stuff happening” to the infra team. This may include the like of overlay networks between those “black boxes”. It’s likely that most of the existing tools that the infra team use for compliance, auditing, etc will not work.

With VIC there is a cleaner line of demarcation. Since all the containers are run as VMs. and the vSphere admin already has tools setup to take care of true operationalizing of VMs, then they inherit this capability with containers.

Reason 4 – Clustering

Up until very recently, Docker Swarm has been very primitive when compared to vSphere HA and DRS clustering techniques as the Docker Swarm placement algorithm was simply using round-robin. I’ll qualify this by saying that Docker just announced a new Swarm mechanism that uses Raft consensus rather than round-robin at DockerCon ’16. However, there is still no consideration given to resource utilization when doing container placement. VCH, through DRS, has intelligent clustering built-in by its very nature. There are also significant considerations in this area when it comes to rolling upgrades/maintenance mode, etc.

Reason  5 – May not be limited to Linux

Since VIC virtualizes at the hardware layer, any x86 compatible operating system is, in theory, eligible for the VIC container treatment, meaning that it’s not limited to Linux. This has yet to be confirmed however, and we will know more closer to GA.

Reason 6 — Manage both VM based apps and CNA apps in the same infra

This is probably the reason that resonates with folks who are already managing vSphere environments. What do you do when a developer asks you to manage this new, container based app? Do you stand up a new silo just to do this? With VIC, you do not need to. Now you can manage both VMs and containers via the same “single pane of glass”.

When to use Photon Controller?

Let’s now talk about when you might use Photon Controller. Photon Controller allows you to pool a bunch of ESXi hosts and use them for the deployment of VMs with the sole purpose of running containers.

Reason 1 – No vCenter Server

This is probably the primary reason. If your proposed “container” deployment will not include the management of VMs but is only focused on managing containers, then you do not need a vCenter Server. Photon Controller does not need a vCenter Server, only ESXi hosts.  And when we position a VMware container solution on “greenfield” sites, we shouldn’t have to be introducing an additional management framework on top of ESXi such as vCenter. The Photon Controller UI will provide the necessary views into this “container” only environment, albeit containers that run on virtual machines.

Reason 2 – ESXi

ESXi is a world-renowned, reliable, best-in-class hypervisor, with a proven track record. If you want to deploy containers in production, and wish to run them in virtual machines, isn’t ESXi the best choice for such as hypervisor? We hear from many developers that they already use the “free” version of ESXi for developing container applications as it allows them to run various container machines/VMs of differing flavours. Plus it also allows them to run different frameworks (Swarm, Kubernetes, Mesos). It would seem to make sense to have a way to manage and consume our flagship hypervisor product for containers at scale.

Reason 3 – Scale

This brings us nicely to our next reason. Photon Controller is not limited by vSphere constructs, such as cluster (which is currently limited to 64 ESXi hosts). There are no such artificial limits with Photon Controller, and you can have as many ESXi hosts as you like providing resources for your container workloads. We are talking about 100s to 1000s of ESXi hosts here.

Reason 4 – Multi-tenancy Resource Management

For those of you familiar with vCloud Director, Photon Controller has some similar constructs for handling multi-tenancy. We have the concept of tenants, and within tenants there is the concept of resource tickets and projects. This facilitates multi-tenancy for containers, and allows resources to be allocated on a per tenant basis, and then on a per-project basis for each tenant. There is also the concept of flavors, for both compute and disk, where resources allocation and sizing of containers can be managed.

Reason 5 – Quick start with cluster/orchestration frameworks

As many of my blog posts on Photon Controller has shown, you can very quickly stand up frameworks such as Kubernetes, Docker Swarm and Mesos using the Photon Controller construct of “Cluster”. This will allow you to get started very quickly on container based projects. On the flip side, if you are more interested in deploying these frameworks using traditional methods such as “docker-machine” or “kube-up”, these are also supported. Either way, deploying these frameworks is very straight forward and quick.

Conclusion

I hope this clarifies the difference between the VIC and Photon Controller projects that VMware is undertaking. There are of course other projects on-going, such as Photon OS. It seems that understanding the difference between VIC and Photon Controller is not quite intuitive, so hopefully this post helps to clarify this in a few ways. One thing that I do want to highlight is that Photon Controller is not a replacement for vCenter Server. It does not have all of the features or services that we associate with vCenter Server, e.g. SRM for DR, VDP for backup, etc.

Many thanks to Ben Corrie and Mike Hall of the VMware CNA BU for taking some time out and providing me with some of their thoughts and ideas on the main differentiators between the two products.

The post Compare and Contrast: Photon Controller vs VIC (vSphere Integrated Containers) appeared first on CormacHogan.com.

Deploy Docker Swarm using docker-machine with Consul on Photon Controller

$
0
0

docker-swarmIn this post I will now show you the steps involved in creating a Docker Swarm configuration using docker-machine with Photon Controller driver plugin. In previous posts, I showed how you can setup Photon OS to deploy Photon Controller and I also showed you how to build docker-machine for Photon Controller. Note that there are a lot of ways to deploy Swarm. Since I was given a demonstration on doing this using “Consul” for cluster membership and discovery, that is the mechanism that I am going to use here. Now, a couple of weeks back, we looked at deploying Docker Swarm using the “cluster” mechanism also available in Photon Controller. This mechanism used “etcd” for discovery, configuration, and so on. In this example, we are going to deploy Docker Swarm from the ground up, step-by-step, using the docker-machine with photon controller driver, but in this example we are going to use “Consul” which does something very similar to “etcd”.

*** Please note that at the time of writing, Photon Controller is still not GA ***

The steps to deploy Docker Swarm with docker machine on Photon Controller can be outlined as follows:

  1. Deploy Photon Controller (link above)
  2. Build the docker-machine driver for Photon Controller (link above)
  3. Setup the necessary PHOTON environment variables in the environment where you will be deploying Swarm
  4. Deploy Consul machine and Consul tool
  5. Deploy a Docker Swarm master
  6. Deploy one or more Docker Swarm slaves (we provision two)
  7. Deploy your containers

Now because we wish to use the Photon Controller for the underlying framework, we need to ensure that we are using the photon driver for the docker-machines (step 2 above), and that we have the environment variables for PHOTON also in place (step 3 above). I am running this deployment from an Ubuntu 16.04 VM. Here is an example of the environment variables taken from my setup:

PHOTON_DISK_FLAVOR=DOCKERDISKFLAVOR
PHOTON_ISO_PATH=/home/cormac/docker-machine/cloud-init.iso
PHOTON_SSH_USER_PASSWORD=tcuser
PHOTON_VM_FLAVOR=DOCKERFLAVOR
PHOTON_SSH_KEYPATH=/home/cormac/.ssh/id_rsa
PHOTON_PROJECT=0e0de526-06ad-4b60-9d15-a021d68566fe
PHOTON_ENDPOINT=http://10.27.44.34
PHOTON_IMAGE=051ba0d7-2560-4533-b90c-77caa4cd6fb0

Once those are in place, the docker machines can now be deployed. Now you could do this manually, one docker-machine at a time. However my good pal Massimo provided me with the script that he created when this demo was run at DockerCon ’16 recently. Here is the script. Note that the driver option to docker-machine is “photon”.

#!/bin/bash

DRIVER="photon"
NUMBEROFNODES=3
echo
echo "*** Step 1 - deploy the Consul machine"
echo
docker-machine create -d ${DRIVER} consul-machine

echo
echo "*** Step 2 - run the Consul tool on the Consul machine"
echo
docker $(docker-machine config consul-machine) run -d -p "8500:8500" -h "consul" \
progrium/consul -server -bootstrap

echo
echo "*** Step 3 - Create the Docker Swarm master node"
echo
docker-machine create -d ${DRIVER} --swarm --swarm-master \
  --swarm-discovery="consul://$(docker-machine ip consul-machine):8500" \
  --engine-opt="cluster-store=consul://$(docker-machine ip consul-machine):8500" \
  --engine-opt="cluster-advertise=eth0:2376"\
  swarm-node-1-master

echo
echo "*** Step 4 - Deploy 2  Docker Swarm slave nodes"
echo
i=2

while [[ ${i} -le ${NUMBEROFNODES} ]]
do
    docker-machine create -d ${DRIVER} --swarm \
      --swarm-discovery="consul://$(docker-machine ip consul-machine):8500" \
      --engine-opt="cluster-store=consul://$(docker-machine ip consul-machine):8500" \
      --engine-opt="cluster-advertise=eth0:2376"\
      swarm-node-${i}
    ((i=i+1))
done

echo
echo "*** Step 5 - Display swarm info"
echo
docker-machine env --swarm swarm-node-1-master

And here is an example output from running the script. This is the start of the script where we deploy “Consul”. Here you can see the VM being created with the initial cloud-init ISO image, the VM network details being discovered and then the OS image being attached to the VM (in this case it is Debian). You then see the certs being moved around locally and copied remotely to give us SSH access to the machines. Finally you see that docker is up and running. In the second step, you can see that “Consul” is launched as a container on that docker-machine.

cormac@cs-dhcp32-29:~/docker-machine-scripts$ ./deploy-swarm.sh

*** Step 1 - deploy the Consul machine

Running pre-create checks...
Creating machine...
(consul-machine) VM was created with Id:  7086eecb-a23f-48e0-87a8-13be5f5222f1
(consul-machine) ISO is attached to VM.
(consul-machine) VM is started.
(consul-machine) VM IP:  10.27.33.112
Waiting for machine to be running, this may take a few minutes...
Detecting operating system of created instance...
Waiting for SSH to be available...
Detecting the provisioner...
Provisioning with debian...
Copying certs to the local machine directory...
Copying certs to the remote machine...
Setting Docker configuration on the remote daemon...
Checking connection to Docker...
Docker is up and running!
To see how to connect your Docker Client to the Docker Engine running on this \
virtual machine, run: docker-machine env consul-machine

*** Step 2 - run the Consul tool on the Consul machine

Unable to find image 'progrium/consul:latest' locally
latest: Pulling from progrium/consul
c862d82a67a2: Pull complete
0e7f3c08384e: Pull complete
0e221e32327a: Pull complete
09a952464e47: Pull complete
60a1b927414d: Pull complete
4c9f46b5ccce: Pull complete
417d86672aa4: Pull complete
b0d47ad24447: Pull complete
fd5300bd53f0: Pull complete
a3ed95caeb02: Pull complete
d023b445076e: Pull complete
ba8851f89e33: Pull complete
5d1cefca2a28: Pull complete
Digest: sha256:8cc8023462905929df9a79ff67ee435a36848ce7a10f18d6d0faba9306b97274
Status: Downloaded newer image for progrium/consul:latest
2ade0f6a921dc208e2cb4fc216278679d3282ca96f4a1508ffdbe95da8760439

Now we come to the section that is specific to Docker Swarm. Many of the steps are similar to what you will see above, but once the OS image is in place, we see the Swarm cluster getting initialized. First we have the master:

*** Step 3 - Create the Docker Swarm master node

Running pre-create checks...
Creating machine...
(swarm-node-1-master) VM was created with Id:  27e28089-6e39-4450-ba37-cde388f427c2
(swarm-node-1-master) ISO is attached to VM.
(swarm-node-1-master) VM is started.
(swarm-node-1-master) VM IP:  10.27.32.103
Waiting for machine to be running, this may take a few minutes...
Detecting operating system of created instance...
Waiting for SSH to be available...
Detecting the provisioner...
Provisioning with debian...
Copying certs to the local machine directory...
Copying certs to the remote machine...
Setting Docker configuration on the remote daemon...
Configuring swarm...
Checking connection to Docker...
Docker is up and running!
To see how to connect your Docker Client to the Docker Engine running on this \
virtual machine, run: docker-machine env swarm-node-1-master

Then we have the two Swarm slaves being deployed:


*** Step 4 - Deploy 2  Docker Swarm slave nodes

Running pre-create checks...
Creating machine...
(swarm-node-2) VM was created with Id:  e44cc8a4-ca90-4644-9abc-a84311ec603b
(swarm-node-2) ISO is attached to VM.
(swarm-node-2) VM is started.
(swarm-node-2) VM IP:  10.27.33.114
Waiting for machine to be running, this may take a few minutes...
Detecting operating system of created instance...
Waiting for SSH to be available...
Detecting the provisioner...
Provisioning with debian...
Copying certs to the local machine directory...
Copying certs to the remote machine...
Setting Docker configuration on the remote daemon...
Configuring swarm...
Checking connection to Docker...
Docker is up and running!
To see how to connect your Docker Client to the Docker Engine running on this \
virtual machine, run: docker-machine env swarm-node-2
.
.

If you wish to do deploy a slave manually, you would simply run the command below. This is deploying one of the slave nodes by hand. You can use this to add additional slaves to the cluster later on.

cormac@cs-dhcp32-29:~/docker-machine-scripts$  docker-machine create -d photon \
--swarm --swarm-discovery="consul://$(docker-machine ip consul-machine):8500"  \
--engine-opt="cluster-store=consul://$(docker-machine ip consul-machine):8500" \
--engine-opt="cluster-advertise=eth0:2376" swarm-node-3
Running pre-create checks...
Creating machine...
(swarm-node-3) VM was created with Id:  2744e118-a16a-43ba-857a-472d87502b85
(swarm-node-3) ISO is attached to VM.
(swarm-node-3) VM is started.
(swarm-node-3) VM IP:  10.27.33.118
Waiting for machine to be running, this may take a few minutes...
Detecting operating system of created instance...
Waiting for SSH to be available...
Detecting the provisioner...
Provisioning with debian...
Copying certs to the local machine directory...
Copying certs to the remote machine...
Setting Docker configuration on the remote daemon...
Configuring swarm...
Checking connection to Docker...
Docker is up and running!
To see how to connect your Docker Client to the Docker Engine running on this \
virtual machine, run: docker-machine env swarm-node-3
cormac@cs-dhcp32-29:~/docker-machine-scripts$

Now both the slaves, and the master have been deployed. The final steps just gives info about the Swarm environment.

*** Step 5 - Display swarm info

export DOCKER_TLS_VERIFY="1"
export DOCKER_HOST="tcp://10.27.32.103:3376"
export DOCKER_CERT_PATH="/home/cormac/.docker/machine/machines/swarm-node-1-master"
export DOCKER_MACHINE_NAME="swarm-node-1-master"
# Run this command to configure your shell:
# eval $(docker-machine env --swarm swarm-node-1-master)

to show all of the docker-machines, run docker-machine ls:

cormac@cs-dhcp32-29:/etc$ docker-machine ls
NAME                  ACTIVE      DRIVER   STATE     URL                       \
SWARM                          DOCKER    ERRORS
consul-machine        -           photon   Running   tcp://10.27.33.112:2376   \
                               v1.11.2
swarm-node-1-master   * (swarm)   photon   Running   tcp://10.27.32.103:2376   \
swarm-node-1-master (master)   v1.11.2
swarm-node-2          -           photon   Running   tcp://10.27.33.114:2376   \
swarm-node-1-master            v1.11.2
swarm-node-3          -           photon   Running   tcp://10.27.33.118:2376   \
swarm-node-1-master            v1.11.2
cormac@cs-dhcp32-29:/etc$

This displays the machine running the “Consul” container, as well as the master node and two slave nodes in my Swarm cluster. Now we can examine the cluster setup in more detail with docker info, after we run the eval command highlighted in the output above to configure our shell:

cormac@cs-dhcp32-29:~/docker-machine-scripts$ eval $(docker-machine env \
--swarm swarm-node-1-master)
cormac@cs-dhcp32-29:~/docker-machine-scripts$ docker info
Containers: 4
 Running: 4
 Paused: 0
 Stopped: 0
Images: 3
Server Version: swarm/1.2.3
Role: primary
Strategy: spread
Filters: health, port, containerslots, dependency, affinity, constraint
Nodes: 3
 swarm-node-1-master: 10.27.32.103:2376
  └ ID: O5ZJ:RFDJ:RXUY:CQV6:2TDL:3ACI:DWCP:5X7A:MKCP:HUAP:4TUD:FE4P
  └ Status: Healthy
  └ Containers: 2
  └ Reserved CPUs: 0 / 1
  └ Reserved Memory: 0 B / 2.061 GiB
  └ Labels: executiondriver=, kernelversion=3.16.0-4-amd64, \
operatingsystem=Debian GNU/Linux 8 (jessie), provider=photon, storagedriver=aufs
  └ UpdatedAt: 2016-06-27T15:39:51Z
  └ ServerVersion: 1.11.2
 swarm-node-2: 10.27.33.114:2376
  └ ID: MGRK:45KO:LATQ:DLCZ:ITFX:PSQC:6P4V:ZQYS:NZ35:SLSK:CDYH:5ZME
  └ Status: Healthy
  └ Containers: 1
  └ Reserved CPUs: 0 / 1
  └ Reserved Memory: 0 B / 2.061 GiB
  └ Labels: executiondriver=, kernelversion=3.16.0-4-amd64, \
operatingsystem=Debian GNU/Linux 8 (jessie), provider=photon, storagedriver=aufs
  └ UpdatedAt: 2016-06-27T15:39:42Z
  └ ServerVersion: 1.11.2
 swarm-node-3: 10.27.33.118:2376
  └ ID: NL4P:YTPC:W464:43TA:PECO:D3M3:6EJG:DQOV:BPLW:CSBA:YUPK:JHSI
  └ Status: Healthy
  └ Containers: 1
  └ Reserved CPUs: 0 / 1
  └ Reserved Memory: 0 B / 2.061 GiB
  └ Labels: executiondriver=, kernelversion=3.16.0-4-amd64, \
operatingsystem=Debian GNU/Linux 8 (jessie), provider=photon, storagedriver=aufs
  └ UpdatedAt: 2016-06-27T15:40:06Z
  └ ServerVersion: 1.11.2
Plugins:
 Volume:
 Network:
Kernel Version: 3.16.0-4-amd64
Operating System: linux
Architecture: amd64
CPUs: 3
Total Memory: 6.184 GiB
Name: 87a4cfa14275

And we can also query the membership in “Consul”. The following command will show the docker master and slave nodes:

cormac@cs-dhcp32-29:~/docker-machine-scripts$ docker run swarm list \
consul://$(docker-machine ip consul-machine):8500
time="2016-06-27T15:43:22Z" level=info msg="Initializing discovery without TLS"
10.27.32.103:2376
10.27.33.114:2376
10.27.33.118:2376

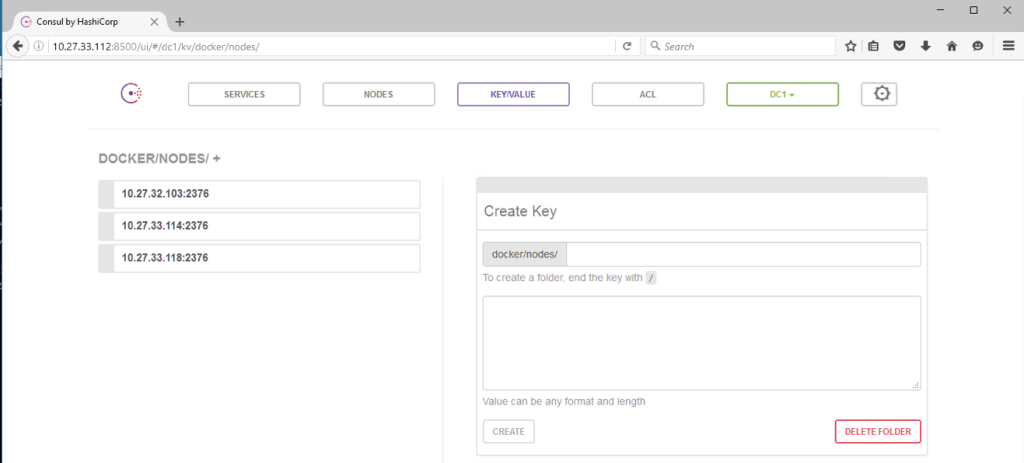
Consul also provides a basic UI. If you point a browser at the docker-machine host running “Consul”, port 8500, this will bring it up. If you navigate to the Key/Value view, click on Docker, then Nodes, the list of members is once again displayed:

Consul UINow you can start to deploy containers on the Swarm cluster, and you should once again see them being placed in a round-robin fashion on the slave machines.

To look at the running containers on each of the nodes in the swarm cluster, you must first select the node you wish to examine:

root@cs-dhcp32-29:~# eval $(docker-machine env swarm-node-1-master)
root@cs-dhcp32-29:~# docker ps
CONTAINER ID        IMAGE               COMMAND                  CREATED        \
     STATUS              PORTS                              NAMES
6920cf9687c1        swarm:latest        "/swarm join --advert"   2 days ago     \
     Up 2 days           2375/tcp                           swarm-agent
8b2148aeeab8        swarm:latest        "/swarm manage --tlsv"   2 days ago     \
     Up 2 days           2375/tcp, 0.0.0.0:3376->3376/tcp   swarm-agent-master
root@cs-dhcp32-29:~# eval $(docker-machine env swarm-node-2)
root@cs-dhcp32-29:~# docker ps
CONTAINER ID        IMAGE               COMMAND                  CREATED        \
     STATUS              PORTS               NAMES
90af8db22134        swarm:latest        "/swarm join --advert"   2 days ago     \
     Up 2 days           2375/tcp            swarm-agent
root@cs-dhcp32-29:~# eval $(docker-machine env swarm-node-3)
root@cs-dhcp32-29:~# docker ps
CONTAINER ID        IMAGE               COMMAND                  CREATED        \
     STATUS              PORTS               NAMES
9ee781ea717d        swarm:latest        "/swarm join --advert"   2 days ago     \
     Up 2 days           2375/tcp            swarm-agent

To look at all the containers together, set DOCKER_HOST and port to 3376 (slide right for full output):

root@cs-dhcp32-29:~# DOCKER_HOST=$(docker-machine ip swarm-node-1-master):3376
root@cs-dhcp32-29:~# export DOCKER_HOST

root@cs-dhcp32-29:~# docker ps -a
CONTAINER ID        IMAGE               COMMAND                  CREATED         \
    STATUS              PORTS                                   NAMES
9ee781ea717d        swarm:latest        "/swarm join --advert"   2 days ago      \
    Up 2 days           2375/tcp                                swarm-node-3/swarm-agent
90af8db22134        swarm:latest        "/swarm join --advert"   2 days ago      \
    Up 2 days           2375/tcp                                swarm-node-2/swarm-agent
6920cf9687c1        swarm:latest        "/swarm join --advert"   2 days ago      \
    Up 2 days           2375/tcp                                swarm-node-1-master/swarm-agent
8b2148aeeab8        swarm:latest        "/swarm manage --tlsv"   2 days ago      \
    Up 2 days           2375/tcp, 10.27.33.169:3376->3376/tcp   swarm-node-1-master/swarm-agent-master
root@cs-dhcp32-29:~#

Next, run some simple containers. I have used the simple “hello-world” one:

root@cs-dhcp32-29:~# docker run hello-world

Hello from Docker!
This message shows that your installation appears to be working correctly.

To generate this message, Docker took the following steps:
 1. The Docker client contacted the Docker daemon.
 2. The Docker daemon pulled the "hello-world" image from the Docker Hub.
 3. The Docker daemon created a new container from that image which runs the
    executable that produces the output you are currently reading.
 4. The Docker daemon streamed that output to the Docker client, which sent it
    to your terminal.

To try something more ambitious, you can run an Ubuntu container with:
 $ docker run -it ubuntu bash

Share images, automate workflows, and more with a free Docker Hub account:
 https://hub.docker.com

For more examples and ideas, visit:
 https://docs.docker.com/engine/userguide/

Now examine the containers that have run with “docker ps -a”:

root@cs-dhcp32-29:~# docker ps -a
... NAMES
... swarm-node-3/trusting_allen
... swarm-node-2/evil_mahavira
... swarm-node-3/swarm-agent
... swarm-node-2/swarm-agent
... swarm-node-1-master/swarm-agent
... swarm-node-1-master/swarm-agent-master
root@cs-dhcp32-29:~#

I parsed the output just to show the NAMES column. Here we can see that the 2 x hello-world containers (the first two in the output) have been placed on different swarm slaves. The containers are being balanced across nodes in a round-robin fashion.

My understanding is that there have been a number improvements made around Docker Swarm at DockerCon ’16, including a better load-balancing mechanism. However, for the purposes of this demo, it is still round-robin.

So once again I hope this shows the flexibility of Photon Controller. Yes, you can quickly deploy Docker Swarm using the “canned” cluster format I described previously. But, if you want more granular control or you wish to use different versions or different tooling (e.g. “Consul” instead of “etcd”), then note that you now have the flexibility to deploy a Docker Swarm using docker-machine. Have fun!

The post Deploy Docker Swarm using docker-machine with Consul on Photon Controller appeared first on CormacHogan.com.

Getting Started with vSphere Integrated Containers v0.4.0

$
0
0

I’ve been working very closely with our vSphere Integrated Container (VIC) team here at VMware recently, and am delighted to say that v0.4.0 is now available for download from GitHub. Of course, this is still not supported in production, and is still in tech preview. However for those of you interested, it gives you an opportunity to try it out and see the significant progress made by the team over the last couple of months. You can download it from bintray. This version of VIC is bringing us closer and closer to the original functionality of “Project Bonneville” for running containers as VMs (not in VMs) on vSphere. The docker API endpoint now provides almost identical functionality to running docker anywhere else, although there is still a little bit of work to do. Let’s take a closer look.

What is VIC?

VIC allows customers to run “containers as VMs” in the vSphere infrastructure, rather than “containers in a VM”. It can be deployed directly to a standalone ESXi host, or it can be deployed to vCenter Server. This has some advantages over the “container in a VM” approach which I highlighted here in my post which compared and contrasted VIC with Photon Controller.

VCH Deployment

Simply pull down the zipped archive from bintray, and extract it. I have downloaded it to a folder called /workspace on my Photon OS VM.

root@photon [ /workspace ]# tar zxvf vic_0.4.0.tar.gz
vic/
vic/bootstrap.iso
vic/vic-machine-darwin
vic/appliance.iso
vic/README
vic/LICENSE
vic/vic-machine-windows.exe
vic/vic-machine-linux

As you can see, there is a vic-machine command for Linux, Windows and Darwin (Fusion). Let’s see what the options are for building the VCH – Virtual Container Host.

The “appliance.iso” is used to deploy the VCH, and the “bootstrap.iso” is used for a minimal Linux image to bootstrap the containers before overlaying them with the chosen image. More on this shortly.

root@photon [ /workspace/vic ]# ./vic-machine-linux
NAME:
 vic-machine-linux - Create and manage Virtual Container Hosts

USAGE:
 vic-machine-linux [global options] command [command options] [arguments...]

VERSION:
 2868-0fcaa7e27730c2b4d8d807f3de19c53670b94477

COMMANDS:
 create Deploy VCH
 delete Delete VCH and associated resources
 inspect Inspect VCH
 version Show VIC version information

GLOBAL OPTIONS:
 --help, -h show help
 --version, -v print the version

And to get more info about the “create” option, do the following:

root@photon [ /workspace/vic ]# ./vic-machine-linux create -h

I won’t display the output here. You can see it for yourself when you run the command. Further details on deployment can also be found here in the official docs. In the following create example, I am going to do the following:

  • Deploy VCH to a vCenter Server at 10.27.51.103
  • I used administrator@vsphere.local as the user, with a password of zzzzzzz
  • Use the cluster called Mgmt as the destination Resource Pool for VCH
  • Create a resource pool and a VCH (Container Host) with the name VCH01
  • The external network (where images will be pulled from by VCH01) is VMNW51
  • The bridge network to allow inter-container communication is a distributed port group called Bridge-DPG
  • The datastore where container images are to be stored is isilion-nfs-01
  • Persistent container volumes will be stored in the folder VIC on isilion-nfs-01 and will be labeled corvols.

Here is the command, and output:

root@photon [ /workspace/vic ]# ./vic-machine-linux create  --bridge-network \
Bridge-DPG  --image-datastore isilion-nfs-01 \
-t 'administrator@vsphere.local:zzzzzzz@10.27.51.103'  \ 
--compute-resource Mgmt --external-network VMNW51 --name VCH01 \ 
--volume-store "corvols:isilion-nfs-01/VIC" 
INFO[2016-07-14T08:03:02Z] ### Installing VCH #### 
INFO[2016-07-14T08:03:02Z] Generating certificate/key pair - private key in ./VCH01-key.pem 
INFO[2016-07-14T08:03:03Z] Validating supplied configuration 
INFO[2016-07-14T08:03:03Z] Firewall status: DISABLED on /CNA-DC/host/Mgmt/10.27.51.8 
INFO[2016-07-14T08:03:03Z] Firewall configuration OK on hosts: 
INFO[2016-07-14T08:03:03Z]   /CNA-DC/host/Mgmt/10.27.51.8 
INFO[2016-07-14T08:03:04Z] License check OK on hosts: 
INFO[2016-07-14T08:03:04Z]   /CNA-DC/host/Mgmt/10.27.51.8 
INFO[2016-07-14T08:03:04Z] DRS check OK on: 
INFO[2016-07-14T08:03:04Z]   /CNA-DC/host/Mgmt/Resources 
INFO[2016-07-14T08:03:04Z] Creating Resource Pool VCH01 
INFO[2016-07-14T08:03:04Z] Datastore path is [isilion-nfs-01] VIC 
INFO[2016-07-14T08:03:04Z] Creating appliance on target 
INFO[2016-07-14T08:03:04Z] Network role client is sharing NIC with external 
INFO[2016-07-14T08:03:04Z] Network role management is sharing NIC with external 
INFO[2016-07-14T08:03:05Z] Uploading images for container 
INFO[2016-07-14T08:03:05Z]      bootstrap.iso 
INFO[2016-07-14T08:03:05Z]      appliance.iso 
INFO[2016-07-14T08:03:10Z] Registering VCH as a vSphere extension 
INFO[2016-07-14T08:03:16Z] Waiting for IP information 
INFO[2016-07-14T08:03:40Z] Waiting for major appliance components to launch 
INFO[2016-07-14T08:03:40Z] Initialization of appliance successful 
INFO[2016-07-14T08:03:40Z] 
INFO[2016-07-14T08:03:40Z] Log server: 
INFO[2016-07-14T08:03:40Z] https://10.27.51.40:2378 
INFO[2016-07-14T08:03:40Z] 
INFO[2016-07-14T08:03:40Z] DOCKER_HOST=10.27.51.40:2376 
INFO[2016-07-14T08:03:40Z] 
INFO[2016-07-14T08:03:40Z] Connect to docker: 
INFO[2016-07-14T08:03:40Z] docker -H 10.27.51.40:2376 --tls info 
INFO[2016-07-14T08:03:40Z] Installer completed successfully 
root@photon [ /workspace/vic ]#

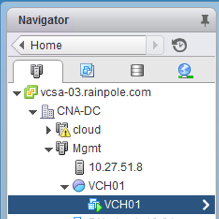
From the last pieces of output, I have the necessary docker API endpoint to allow me to begin creating containers. Let’s look at what has taken place in vCenter at this point. First, we can see the new VCH resource pool and appliance:

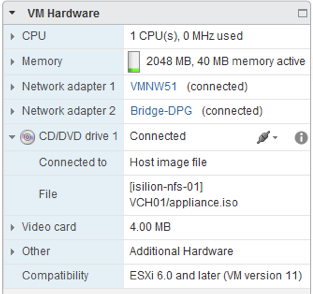
VCH resourcesAnd next if we examine the virtual hardware of the VCH, we can see how the appliance.iso is utilitized, along with the fact that the VCH has access to the external network (VMNW51) for downloading images from docker repos, and access to the container/bridge network:

VCH hardwareDocker Containers

dockerOK – so everything is now in place for us to start creating “containers as VMs” using standard docker commands against the docker endpoint provided by the VCH. Let’s begin with some basic docker query commands such as “info” and “ps”. These can be revisited at any point to get additional details about the state of the containers and images that have been deployed in your vSphere environment. Let’s first display the “info” output immediately followed by the “ps” output.

root@photon [ /workspace/vic ]#  docker -H 10.27.51.40:2376 --tls info
Containers: 0
 Running: 0
 Paused: 0
 Stopped: 0
Images: 0
Storage Driver: vSphere Integrated Containers Backend Engine
vSphere Integrated Containers Backend Engine: RUNNING
Execution Driver: vSphere Integrated Containers Backend Engine
Plugins:
 Volume: ds://://@isilion-nfs-01/%5Bisilion-nfs-01%5D%20VIC
 Network: bridge
Kernel Version: 4.4.8-esx
Operating System: VMware Photon/Linux
OSType: linux
Architecture: x86_64
CPUs: 1
Total Memory: 1.958 GiB
Name: VCH01
ID: vSphere Integrated Containers
Docker Root Dir:
Debug mode (client): false
Debug mode (server): false
Registry: registry-1.docker.io
WARNING: No memory limit support
WARNING: No swap limit support
WARNING: No kernel memory limit support
WARNING: No cpu cfs quota support
WARNING: No cpu cfs period support
WARNING: No cpu shares support
WARNING: No cpuset support
WARNING: IPv4 forwarding is disabled
WARNING: bridge-nf-call-iptables is disabled
WARNING: bridge-nf-call-ip6tables is disabled
root@photon-NaTv5i8IA [ /workspace/vic ]#

root@photon [ /workspace/vic ]#  docker -H 10.27.51.40:2376 --tls ps -a
CONTAINER ID        IMAGE               COMMAND             CREATED             STATUS\
              PORTS               NAMES
root@photon [ /workspace/vic ]#

So not a lot going on at the moment. Let’s deploy our very first (simple) container – busybox:

root@photon [ /workspace/vic ]# docker -H 10.27.51.40:2376 --tls run -it busybox
Unable to find image 'busybox:latest' locally
latest: Pulling from library/busybox
a3ed95caeb02: Pull complete
8ddc19f16526: Pull complete
Digest: sha256:65ce39ce3eb0997074a460adfb568d0b9f0f6a4392d97b6035630c9d7bf92402
Status: Downloaded newer image for library/busybox:latest
/ # ls
bin etc lib mnt root sbin tmp var
dev home lost+found proc run sys usr
/ # ls /etc
group hostname hosts localtime passwd resolv.conf shadow
/ #

This has dropped me into a shell on the image “busybox”. This is a bit of a simple image, but what it has confirmed is that the VCH was able to pull images from docker, and it has successfully launched a “container as a VM” also.

Congratulations! You have deployed your first container “as a VM”.

Let’s now go back to vCenter, and examine things from there. The first thing we notice is that in the VCH resource pool, we have our new container in the inventory:

containerAnd now if we examine the virtual hardware of that container, we can find the location of the image on the image datastore, the fact that it is connected to the container/bridge network, and that the CD is connected to the “bootstrap.iso” image that we saw in the VCH folder on initial deployment.

container vHWAnd now if I return to the photon OS CLI (open a new shell), then I can run additional docker commands such as “ps” to examine the state:

root@photon [ /workspace ]#  docker -H 10.27.51.40:2376 --tls ps -a
CONTAINER ID        IMAGE               COMMAND             CREATED             STATUS \
             PORTS               NAMES
045e56ad498c        busybox             "sh"                20 minutes ago      Running\
                                 ecstatic_meninsky
root@photon [ /workspace ]# 

And we can see our running container. Now there are a lot of other things that we can do, but this is hopefully enough to get you started with v0.4.0.

Removing VCH

To tidy up, you can follow this procedure. First stop and remove the containers, then remove the VCH:

root@photon [ /workspace/vic ]# docker -H 10.27.51.40:2376 --tls stop 045e56ad498c
045e56ad498c
root@photon [ /workspace/vic ]# docker -H 10.27.51.40:2376 --tls rm 045e56ad498c
045e56ad498c
root@photon [ /workspace/vic ]# docker -H 10.27.51.40:2376 --tls ps -a
CONTAINER ID IMAGE COMMAND CREATED STATUS PORTS NAMES
root@photon [ /workspace/vic ]# ./vic-machine-linux delete \
-t 'administrator@vsphere.local:VMware123!@10.27.51.103' \
--compute-resource Mgmt --name VCH01
INFO[2016-07-14T09:20:55Z] ### Removing VCH ####
INFO[2016-07-14T09:20:55Z] Removing VMs
INFO[2016-07-14T09:20:55Z] Removing images
INFO[2016-07-14T09:20:55Z] Removing volumes
INFO[2016-07-14T09:20:56Z] Removing appliance VM network devices
INFO[2016-07-14T09:20:58Z] Removing VCH vSphere extension
INFO[2016-07-14T09:21:02Z] Removing Resource Pool VCH01
INFO[2016-07-14T09:21:02Z] Completed successfully
root@photon [ /workspace/vic ]#

For more details on using vSphere Integrated Containers v0.4.0 see the user guide on github here and command usage guide on github here.

And if you are coming to VMworld 2016, you should definitely check out the various sessions, labs and demos on Cloud Native Apps (CNA).

The post Getting Started with vSphere Integrated Containers v0.4.0 appeared first on CormacHogan.com.
Container Volumes in VIC v0.4.0

$
0
0

I mentioned yesterday that VMware made vSphere Integrated Containers (VIC) v0.4.0 available. Included in this version is support for container volumes. Now, as mentioned yesterday, VIC is still a work in progress, and not everything has yet been implemented. In this post I want to step you through some of the enhancements that we have made around docker volume support in VIC. This will hopefully provide you with enough information so that you can try this out for yourself.

To begin with, you need to ensure that a “volume store” is created when the VCH (Virtual Container Host) is deployed. This is a datastore and folder where the volumes are stored, and for ease of use, you can apply a label to it. One useful tit-bit here is that if you use the label “default” for your volume store, you do not have to specify it in the docker volume command line. For example, if I deploy a VCH as follows, note the –volume-store parameter. The format is “label:datastore/folder-on-datastore”. Here I have requested that the volume store be placed on the isilion-nfs-01 datastore in the folder called docker-vols. I have also labeled it as “default”. For information on the other parameters, refer to my previous post – Getting started with VIC v0.4.0.

root@photon [ /workspace/vic ]# ./vic-machine-linux create  \
--bridge-network Bridge-DPG --image-datastore isilion-nfs-01 \
-t 'administrator@vsphere.local:zzzzz@10.27.51.103'  \
--compute-resource Mgmt --external-network VMNW51 --name VCH01 \
--volume-store "default:isilion-nfs-01/docker-vols"
INFO[2016-07-14T11:25:13Z] ### Installing VCH ####
INFO[2016-07-14T11:25:13Z] Generating certificate/key pair - private key in ./VCH01-key.pem
INFO[2016-07-14T11:25:13Z] Validating supplied configuration
INFO[2016-07-14T11:25:13Z] Firewall status: DISABLED on /CNA-DC/host/Mgmt/10.27.51.8
INFO[2016-07-14T11:25:13Z] Firewall configuration OK on hosts:
INFO[2016-07-14T11:25:13Z]   /CNA-DC/host/Mgmt/10.27.51.8
INFO[2016-07-14T11:25:13Z] License check OK on hosts:
INFO[2016-07-14T11:25:13Z]   /CNA-DC/host/Mgmt/10.27.51.8
INFO[2016-07-14T11:25:13Z] DRS check OK on:
INFO[2016-07-14T11:25:13Z]   /CNA-DC/host/Mgmt/Resources
INFO[2016-07-14T11:25:14Z] Creating Resource Pool VCH01
INFO[2016-07-14T11:25:14Z] Creating directory [isilion-nfs-01] docker-vols
INFO[2016-07-14T11:25:14Z] Datastore path is [isilion-nfs-01] docker-vols
INFO[2016-07-14T11:25:14Z] Creating appliance on target
INFO[2016-07-14T11:25:14Z] Network role client is sharing NIC with external
INFO[2016-07-14T11:25:14Z] Network role management is sharing NIC with external
INFO[2016-07-14T11:25:15Z] Uploading images for container
INFO[2016-07-14T11:25:15Z]      bootstrap.iso
INFO[2016-07-14T11:25:15Z]      appliance.iso
INFO[2016-07-14T11:25:20Z] Registering VCH as a vSphere extension
INFO[2016-07-14T11:25:26Z] Waiting for IP information
INFO[2016-07-14T11:25:52Z] Waiting for major appliance components to launch
INFO[2016-07-14T11:25:52Z] Initialization of appliance successful
INFO[2016-07-14T11:25:52Z]
INFO[2016-07-14T11:25:52Z] Log server:
INFO[2016-07-14T11:25:52Z] https://10.27.51.42:2378
INFO[2016-07-14T11:25:52Z]
INFO[2016-07-14T11:25:52Z] DOCKER_HOST=10.27.51.42:2376
INFO[2016-07-14T11:25:52Z]
INFO[2016-07-14T11:25:52Z] Connect to docker:
INFO[2016-07-14T11:25:52Z] docker -H 10.27.51.42:2376 --tls info
INFO[2016-07-14T11:25:52Z] Installer completed successfully
root@photon [ /workspace/vic ]#

Now that my VCH is deployed and my docker endpoint is available, we can use the docker command to create volumes and attach them to containers.

First thing to note – the “docker volume ls” and the “docker volume inspect” commands are not yet implemented. So we do not yet have a good way of examining the storage consumption and layout through the docker API. This is work in progress however. That aside, we can still create and consume volumes. Here is how to do that.

root@photon [ /workspace/vic ]#  docker -H 10.27.51.42:2376 --tls volume create \
--name=demo --opt Capacity=1024
demo
root@photon [ /workspace/vic ]#
Notice that I did not specify which “volume store” to use; it simply defaulted to “default” which is the docker-vols folder on my isilion-nfs-01 datastore. Let’s now take a look and see what got created from a vSphere perspective. If I select the datastore in the inventory, then view the files, I see a <volume-name>.VMDK was created in the folder docker-vols/VIC/volumes/<volume-name>:

files viewSo one thing to point out here – the Capacity=1024 option in the docker volume create command is a representation of 1MB blocks. So what was created is a 1GB VMDK. My understanding is that we will add additional granularity to this capacity option going forward.

Now to create a container to consume this volume. Let’s start with an Ubuntu image:

root@photon [ /workspace/vic ]# docker -H 10.27.51.42:2376 --tls run \
-v demo:/demo -it ubuntu /bin/bash
root@3ef0b682bc8d:/#

root@3ef0b682bc8d:/# mount | grep demo
/dev/sdb on /demo type ext4 (rw,noatime,data=ordered)

root@3ef0b682bc8d:/# df -h
Filesystem Size Used Avail Use% Mounted on
devtmpfs 965M 0 965M 0% /dev
tmpfs 1003M 0 1003M 0% /dev/shm
tmpfs 1003M 136K 1003M 1% /run
tmpfs 1003M 0 1003M 0% /sys/fs/cgroup
/dev/sda 7.8G 154M 7.2G 3% /
tmpfs 128M 43M 86M 34% /.tether
tmpfs 1.0M 0 1.0M 0% /.tether-init
rootfs 965M 0 965M 0% /lib/modules
/dev/disk/by-label/fe01ce2a7fbac8fa 976M 1.3M 908M 1% /demo
root@751ecc91c355:/#
Let’s now create a file in the volume in question, and make sure the data is persistent:

root@3ef0b682bc8d:/# cd /demo
root@3ef0b682bc8d:/demo# echo "important" >> need-to-persist.txt
root@3ef0b682bc8d:/demo# cat need-to-persist.txt
important
root@3ef0b682bc8d:/demo# cd ..
root@3ef0b682bc8d:/# exit
exit
Now launch a new container (a simple busybox image) with the same volume, and ensure that the data that we created is still accessible and persistent.

root@photon [ /workspace/vic ]#  docker -H 10.27.51.42:2376 --tls run \
-v demo:/demo -it busybox
Unable to find image 'busybox:latest' locally
latest: Pulling from library/busybox
a3ed95caeb02: Pull complete
8ddc19f16526: Pull complete
Digest: sha256:65ce39ce3eb0997074a460adfb568d0b9f0f6a4392d97b6035630c9d7bf92402
Status: Downloaded newer image for library/busybox:latest

/ # df
Filesystem           1K-blocks      Used Available Use% Mounted on
devtmpfs                987544         0    987544   0% /dev
tmpfs                  1026584         0   1026584   0% /dev/shm
tmpfs                  1026584       132   1026452   0% /run
tmpfs                  1026584         0   1026584   0% /sys/fs/cgroup
/dev/sda               8125880     19612   7670456   0% /
tmpfs                   131072     43940     87132  34% /.tether
tmpfs                     1024         0      1024   0% /.tether-init
/dev/disk/by-label/fe01ce2a7fbac8fa
                        999320      1288    929220   0% /demo
/ # cd /demo
/demo # ls
lost+found           need-to-persist.txt
/demo # cat need-to-persist.txt
important
/demo #

There you have it – docker volumes in VIC. One final note is what happens when the VCH is deleted. If the VCH is deleted, then the docker volumes associated with that VCH are also deleted (although I also believe that we will change this behavior in future versions):

root@photon [ /workspace/vic ]# ./vic-machine-linux delete -t 
'administrator@vsphere.local:zzzzz@10.27.51.103' \
--compute-resource Mgmt --name VCH01
INFO[2016-07-14T14:36:26Z] ### Removing VCH ####
INFO[2016-07-14T14:36:26Z] Removing VMs
INFO[2016-07-14T14:36:29Z] Removing images
INFO[2016-07-14T14:36:29Z] Removing volumes
INFO[2016-07-14T14:36:29Z] Removing appliance VM network devices
INFO[2016-07-14T14:36:30Z] Removing VCH vSphere extension
INFO[2016-07-14T14:36:35Z] Removing Resource Pool VCH01
INFO[2016-07-14T14:36:35Z] Completed successfully
root@photon-NaTv5i8IA [ /workspace/vic ]#

So for now, be careful if you place data in a volume, and then remove the VCH as this will also remove the volumes.

OK – one final test. Let’s assume that you did not use the “default” label, or that you had multiple volume store specified in the command line (which is perfectly acceptable). How then would you select the correct datastore for the volume? Let’s deploy a new VCH, and this time we will set the label to NFS:

root@photon [ /workspace/vic ]#  ./vic-machine-linux create \
--bridge-network Bridge-DPG --image-datastore isilion-nfs-01 \
-t 'administrator@vsphere.local:VMware123!@10.27.51.103' \
 --compute-resource Mgmt --external-network VMNW51 --name VCH01 \
--volume-store "NFS:isilion-nfs-01/docker-vols"
INFO[2016-07-14T14:43:04Z] ### Installing VCH ####
INFO[2016-07-14T14:43:04Z] Generating certificate/key pair - private key in ./VCH01-key.pem
INFO[2016-07-14T14:43:05Z] Validating supplied configuration
INFO[2016-07-14T14:43:05Z] Firewall status: DISABLED on /CNA-DC/host/Mgmt/10.27.51.8
INFO[2016-07-14T14:43:05Z] Firewall configuration OK on hosts:
INFO[2016-07-14T14:43:05Z]   /CNA-DC/host/Mgmt/10.27.51.8
INFO[2016-07-14T14:43:05Z] License check OK on hosts:
INFO[2016-07-14T14:43:05Z]   /CNA-DC/host/Mgmt/10.27.51.8
INFO[2016-07-14T14:43:05Z] DRS check OK on:
INFO[2016-07-14T14:43:05Z]   /CNA-DC/host/Mgmt/Resources
INFO[2016-07-14T14:43:06Z] Creating Resource Pool VCH01
INFO[2016-07-14T14:43:06Z] Datastore path is [isilion-nfs-01] docker-vols
INFO[2016-07-14T14:43:06Z] Creating appliance on target
INFO[2016-07-14T14:43:06Z] Network role management is sharing NIC with client
INFO[2016-07-14T14:43:06Z] Network role external is sharing NIC with client
INFO[2016-07-14T14:43:08Z] Uploading images for container
INFO[2016-07-14T14:43:08Z]      bootstrap.iso
INFO[2016-07-14T14:43:08Z]      appliance.iso
INFO[2016-07-14T14:43:13Z] Registering VCH as a vSphere extension
INFO[2016-07-14T14:43:18Z] Waiting for IP information
INFO[2016-07-14T14:43:44Z] Waiting for major appliance components to launch
INFO[2016-07-14T14:43:44Z] Initialization of appliance successful
INFO[2016-07-14T14:43:44Z]
INFO[2016-07-14T14:43:44Z] Log server:
INFO[2016-07-14T14:43:44Z] https://10.27.51.47:2378
INFO[2016-07-14T14:43:44Z]
INFO[2016-07-14T14:43:44Z] DOCKER_HOST=10.27.51.47:2376
INFO[2016-07-14T14:43:44Z]
INFO[2016-07-14T14:43:44Z] Connect to docker:
INFO[2016-07-14T14:43:44Z] docker -H 10.27.51.47:2376 --tls info
INFO[2016-07-14T14:43:44Z] Installer completed successfully

Now we want to create a volume, but place it in the folder/datastore identified by the label NFS. First, let’s try to create a volume as before:

root@photon [ /workspace/vic ]# docker -H 10.27.51.47:2376 --tls --tls \
volume create --name=demo --opt Capacity=1024
Error response from daemon: Server error from Portlayer: [POST /storage/volumes/][500]\
 createVolumeInternalServerError

Yes – we know it is a horrible error message, and we will fix that. But to make it work, you now need another option to docker volume called VolumeStore. Here it is.

root@photon [ /workspace/vic ]# docker -H 10.27.51.47:2376 --tls \
 volume create --name=demo --opt Capacity=1024 --opt VolumeStore=NFS
demo
root@photon [ /workspace/vic ]#

Now you can consume the volume in the same way as it was shown in the previous example.

Caution: A number of commands shown here will definitely change in future releases of VIC. However, what I have shown you is how to get started with docker volumes in VIC v0.4.0. If you do run into some anomalies that are not described in the post, and you feel it is a mismatch in behavior with standard docker, please let me know. I will feed this back to our engineering team, who are always open to suggestions on how to make VIC as seamless as possible to standard docker behavior.

The post Container Volumes in VIC v0.4.0 appeared first on CormacHogan.com.

Getting started with vSphere Integrated Containers (short video)

$
0
0

I decided to put together a very short video on VIC – vSphere Integrated Containers v0.4.0. In the video, I show you how to create your very first VCH (Virtual Container Host) and then I show you how you can create a very simple container using a docker API endpoint. I also show you how this is reflected in vSphere. Of course, VIC v0.4.0 is still a tech preview, and is not ready for production. Also note that a number of things may change before the VIC becomes generally available (GA). However, hopefully this is of interest to those of you who wish to get started with v0.4.0.


For more information on VIC v0.4.0, visit us on github.

The post Getting started with vSphere Integrated Containers (short video) appeared first on CormacHogan.com.

Container Networks in VIC 0.4.0

$
0
0

docker networksThis is part of a series of articles describing how to use the new features of vSphere Integrated Containers (VIC) v0.4.0. In previous posts, we have looked at deploying your first VCH (Virtual Container Hosts) and container using the docker API. I also showed you how to create some volumes to provide consistent storage for containers. In this post, we shall take a closer look at networking, and what commands are available to do container networking. I will also highlight some areas where there is still work to be done.

Also, please note that VIC is still not production ready. The aim of these posts is to get you started with VIC, and help you to familiarize yourself with some of the features. Many of the commands and options which work for v0.4.0 may not work in future releases, especially the GA version.

I think the first thing we need to do is to describe the various networks that may be configured when a Virtual Container Host is deployed.

Bridge network         

The bridge network identifies a private port group for containers. This is a network used to support container to container communications. IP addresses on this network are managed by the VCH appliance VM and it’s assumed that this network is private and only the containers are attached to it. If this option is omitted from the create command, and the target is an ESXi host, then a regular standard vSwitch will be created with no physical uplinks associated with it. If the network is omitted, and the target is a vCenter server, an error will be displayed as a distributed port group is required and needs to exist in advance of the deployment. This should be dedicated and must not be the same as any management, external or client network.

Management network     

The management network  identifies the network that the VCH appliance VM should use to connect to the vSphere infrastructure. This must be the same vSphere infrastructure identified in the target parameter. This is also the network over which the VCH appliance VM will receive incoming connections (on port 2377) from the ESXi hosts running the “containers as VMs”. This means that (a) the VCH appliance VM must be able to reach the  vSphere API and (b) the ESXi hosts running the container VMs must be able to reach the VCH appliance VM (to support the docker attach call).

External network       

The external network. This is a VM portgroup/network on the vSphere environment on which container port forwarding should occur, e.g.   docker run –p 8080:80 –d tomcat will expose port 8080 on the VCH appliance VM (that is serving the DOCKER_API) and forward connections from the identified network to the tomcat container. If –-client-network is specified as a different VM network, then attempting to connect to port 8080 on the appliance from the client network will fail. Likewise attempting to connect to the docker API from the external  network will also fail. This allows some degree of control over how exposed the dockerAPI is while still exposing ports for application traffic. It defaults to the “VM Network”.

Client network         

The client network. This identifies a VM portgroup/network on the vSphere environment that is the network which has access to the DOCKER_API.   If not set, It defaults to the same network as the external network.

Default Container network

This is the name of a network that can be used for inter-container communication instead of the bridge network. It must use the name of an existing distributed port group when deploying VIC to a vCenter server target. An alias can be specified, but if not specified the alias is set to the name of the port. The alias is used when specifying the container network DNS, the container network gateway, and a container network ip address range. This allows multiple container networks to be specified. The defaults are 172.16.0.1 for DNS server and gateway and 172.16.0.0/16 for the ip address range. If container network is not specified, the bridge network is used by default.

This network diagram, taken from the official VIC documentation on github, provides a very good overview of the various VIC related networks:

vic-network_diagramLet’s run some VCH deployment examples with some different network options. First, I will not specify any network options which means that management and client will share the same network as external, which defaults to the VM Network. My VM Network is attached to VLAN 32, and has a DHCP server to provide IP address. Here are the results.

root@photon-NaTv5i8IA [ /workspace/vic ]# ./vic-machine-linux create  \
--bridge-network Bridge-DPG \
--image-datastore isilion-nfs-01 \
-t 'administrator@vsphere.local:zzzzzzz@10.27.51.103'  \
--compute-resource Mgmt
INFO[2016-07-15T09:31:59Z] ### Installing VCH ####
.
.
INFO[2016-07-15T09:32:01Z] Network role client is sharing NIC with external
INFO[2016-07-15T09:32:01Z] Network role management is sharing NIC with external
.
.
INFO[2016-07-15T09:32:34Z] Connect to docker:
INFO[2016-07-15T09:32:34Z] docker -H 10.27.32.113:2376 --tls info
INFO[2016-07-15T09:32:34Z] Installer completed successfully

Now, let deploy my external network on another network. This time it is VM Network “VMNW51”. This is on VLAN 51, which also has a DHCP server to provide addresses. Note once again that the client and external network use the same network as the external network.

root@photon-NaTv5i8IA [ /workspace/vic ]# ./vic-machine-linux create \
--bridge-network Bridge-DPG \
--image-datastore isilion-nfs-01 \
-t 'administrator@vsphere.local:zzzzz@10.27.51.103' \
--compute-resource Mgmt \
--external-network VMNW51"
INFO[2016-07-14T14:43:04Z] ### Installing VCH ####
.
.
INFO[2016-07-14T14:43:06Z] Network role management is sharing NIC with client
INFO[2016-07-14T14:43:06Z] Network role external is sharing NIC with client
.
.
INFO[2016-07-14T14:43:44Z] Connect to docker:
INFO[2016-07-14T14:43:44Z] docker -H 10.27.51.47:2376 --tls info
INFO[2016-07-14T14:43:44Z] Installer completed successfully

Now let’s try an example where the external network is on VLAN 32 but the management network is on VLAN 51. Note now that there is not message about management network sharing NIC with client.

root@photon-NaTv5i8IA [ /workspace/vic ]# ./vic-machine-linux create \
--bridge-network Bridge-DPG \
--image-datastore isilion-nfs-01 \
-t 'administrator@vsphere.local:zzzzzzz@10.27.51.103' \
--compute-resource Mgmt \
--management-network "VMNW51" \
--external-network "VM Network"
INFO[2016-07-15T09:40:43Z] ### Installing VCH ####
.
.
INFO[2016-07-15T09:40:45Z] Network role client is sharing NIC with external
.
.
INFO[2016-07-15T09:41:24Z] Connect to docker:
INFO[2016-07-15T09:41:24Z] docker -H 10.27.33.44:2376 --tls info
INFO[2016-07-15T09:41:24Z] Installer completed successfully
root@photon-NaTv5i8IA [ /workspace/vic ]#

Let’s examine the VCH appliance VM from a vSphere perspective:

VCH NetworkSo we can see 3 adapters on the VCH – 1 is the external network, 2 is the management network and 3 is the bridge network to access the container network. And finally, just to ensure that we can deploy a container with this network configuration, we will do the following:

root@photon-NaTv5i8IA [ /workspace/vic ]# docker -H 10.27.33.44:2376 --tls \
run -it busybox
Unable to find image 'busybox:latest' locally
latest: Pulling from library/busybox
a3ed95caeb02: Pull complete
8ddc19f16526: Pull complete
Digest: sha256:65ce39ce3eb0997074a460adfb568d0b9f0f6a4392d97b6035630c9d7bf92402
Status: Downloaded newer image for library/busybox:latest

/ #

Now that we have connected to the container running the busybox image, let’s examine its networking:

/ # ip a
1: lo: <LOOPBACK,UP,LOWER_UP> mtu 65536 qdisc noqueue qlen 1
    link/loopback 00:00:00:00:00:00 brd 00:00:00:00:00:00
    inet 127.0.0.1/8 scope host lo
       valid_lft forever preferred_lft forever
    inet6 ::1/128 scope host
       valid_lft forever preferred_lft forever
2: eth0: <BROADCAST,MULTICAST,UP,LOWER_UP> mtu 1500 qdisc mq qlen 1000
    link/ether 00:50:56:86:18:b6 brd ff:ff:ff:ff:ff:ff
    inet 172.16.0.2/16 scope global eth0
       valid_lft forever preferred_lft forever
    inet6 fe80::250:56ff:fe86:18b6/64 scope link
       valid_lft forever preferred_lft forever
/ #
/ # cat /etc/resolv.conf
nameserver 172.16.0.1
/#
/ # netstat -rn
Kernel IP routing table
Destination Gateway Genmask Flags MSS Window irtt Iface
0.0.0.0 172.16.0.1 0.0.0.0 UG 0 0 0 eth0
172.16.0.0 0.0.0.0 255.255.0.0 U 0 0 0 eth0
/ #


So we can see that it has been assigned an ip address of 172.16.0.2, and that the DNS server and gateway are set to 172.16.0.1. This is the default container network in VIC.

Alternate Container Network

Let’s now look at creating a completely different container network. To do this, we use some additional vic-machine command line arguments, as shown below:

./vic-machine-linux create --bridge-network Bridge-DPG \
--image-datastore isilion-nfs-01 \
-t 'administrator@vsphere.local:VMware123!@10.27.51.103' \
--compute-resource Mgmt \
--container-network con-nw:con-nw \
--container-network-gateway con-nw:192.168.100.1/16 \
--container-network-dns con-nw:192.168.100.1 \
--container-network-ip-range con-nw:192.168.100.2-100

The first thing to note is that since I am deploying to a vCenter Server target, the container network must be a distributed portgroup. In my case, it is called con-nw, and the parameter –container-network specifies which DPG to use. You also have the option of adding an alias for the network, separated from the DPG with “:”. This alias can then be used in other parts of the command line. If you do not specify an alias, the full name of the DPG must be used in other parts of the command line. In my case, I made the alias the same as the DPG.

[Note: this is basically an external network, so the DNS and gateway, as well as the range of consumable IP addresses for containers must be available through some external means – containers are simply consuming them, and VCH will not provide DHCP or DNS services on this external network]

Other commands are necessary to specify the gateway, DNS server and IP address range for this container network. CIDR, and ranges both work. Note however that the IP address range must not include the IP address for the gateway or DNS server, which is why I have specified a range. Here is the output from running the command:

INFO[2016-07-20T09:06:05Z] ### Installing VCH ####
INFO[2016-07-20T09:06:05Z] Generating certificate/key pair - private key in \
./virtual-container-host-key.pem
INFO[2016-07-20T09:06:07Z] Validating supplied configuration
INFO[2016-07-20T09:06:07Z] Firewall status: DISABLED on /CNA-DC/host/Mgmt/10.27.51.8
INFO[2016-07-20T09:06:07Z] Firewall configuration OK on hosts:
INFO[2016-07-20T09:06:07Z] /CNA-DC/host/Mgmt/10.27.51.8
INFO[2016-07-20T09:06:07Z] License check OK on hosts:
INFO[2016-07-20T09:06:07Z] /CNA-DC/host/Mgmt/10.27.51.8
INFO[2016-07-20T09:06:07Z] DRS check OK on:
INFO[2016-07-20T09:06:07Z] /CNA-DC/host/Mgmt/Resources
INFO[2016-07-20T09:06:08Z] Creating Resource Pool virtual-container-host
INFO[2016-07-20T09:06:08Z] Creating appliance on target
ERRO[2016-07-20T09:06:08Z] unable to encode []net.IP (slice) for \
guestinfo./container_networks|con-nw/dns: net.IP is an unhandled type
INFO[2016-07-20T09:06:08Z] Network role client is sharing NIC with external
INFO[2016-07-20T09:06:08Z] Network role management is sharing NIC with external
ERRO[2016-07-20T09:06:09Z] unable to encode []net.IP (slice) for \
guestinfo./container_networks|con-nw/dns: net.IP is an unhandled type
INFO[2016-07-20T09:06:09Z] Uploading images for container
INFO[2016-07-20T09:06:09Z] bootstrap.iso
INFO[2016-07-20T09:06:09Z] appliance.iso
INFO[2016-07-20T09:06:14Z] Registering VCH as a vSphere extension
INFO[2016-07-20T09:06:20Z] Waiting for IP information
INFO[2016-07-20T09:06:41Z] Waiting for major appliance components to launch
INFO[2016-07-20T09:06:41Z] Initialization of appliance successful
INFO[2016-07-20T09:06:41Z]
INFO[2016-07-20T09:06:41Z] Log server:
INFO[2016-07-20T09:06:41Z] https://10.27.32.116:2378
INFO[2016-07-20T09:06:41Z]
INFO[2016-07-20T09:06:41Z] DOCKER_HOST=10.27.32.116:2376
INFO[2016-07-20T09:06:41Z]
INFO[2016-07-20T09:06:41Z] Connect to docker:
INFO[2016-07-20T09:06:41Z] docker -H 10.27.32.116:2376 --tls info
INFO[2016-07-20T09:06:41Z] Installer completed successfully


Ignore the “unable to encode” errors – these will be removed in a future release. Before we create our first container, lets examine the networks:

root@photon-NaTv5i8IA [ /workspace/vic ]# docker -H 10.27.32.116:2376 \
--tls network ls
NETWORK ID          NAME                DRIVER
8627c6f733e8        bridge              bridge
c23841d4ac24        con-nw              external

Run a Container on the Container Network

Now we can run a container (a simple busybox one) and specify our newly created “con-nw”, as shown here:

root@photon-NaTv5i8IA [ /workspace/vic040 ]# docker -H 10.27.32.116:2376\
 --tls run -it --net=con-nw busybox
Unable to find image 'busybox:latest' locally
latest: Pulling from library/busybox
a3ed95caeb02: Pull complete
8ddc19f16526: Pull complete
Digest: sha256:65ce39ce3eb0997074a460adfb568d0b9f0f6a4392d97b6035630c9d7bf92402
Status: Downloaded newer image for library/busybox:latest
/ # 

Now lets take a look at the networking inside the Container:

/ # ip a
1: lo: <LOOPBACK,UP,LOWER_UP> mtu 65536 qdisc noqueue qlen 1
 link/loopback 00:00:00:00:00:00 brd 00:00:00:00:00:00
 inet 127.0.0.1/8 scope host lo
 valid_lft forever preferred_lft forever
 inet6 ::1/128 scope host
 valid_lft forever preferred_lft forever
2: eth0: <BROADCAST,MULTICAST,UP,LOWER_UP> mtu 1500 qdisc mq qlen 1000
 link/ether 00:50:56:86:51:bc brd ff:ff:ff:ff:ff:ff
 inet 192.168.100.2/16 scope global eth0
 valid_lft forever preferred_lft forever
 inet6 fe80::250:56ff:fe86:51bc/64 scope link
 valid_lft forever preferred_lft forever
/ # netstat -rn
Kernel IP routing table
Destination Gateway Genmask Flags MSS Window irtt Iface
0.0.0.0 192.168.100.1 0.0.0.0 UG 0 0 0 eth0
192.168.0.0 0.0.0.0 255.255.0.0 U 0 0 0 eth0
/ # cat /etc/resolv.conf
nameserver 192.168.100.1
/ #

So it looks like all of the container network settings have taken effect. And if we look at this container from a vSphere perspective, we can see it is attached to the con-nw DPG:

con-nwThis is one of the advantages of VIC – visibility into container network configurations (not just a block-box).

Some caveats

As I keep mentioning, this product is not yet production ready, but it is getting close. The purpose of these posts is to give you a good experience if you want to try out v0.4.0 right now. With that in mind, there are a few caveats to be aware of with this version.

  1. Port exposing/Port mapping is not yet working. If you want to run something like a web server type app (e.g. Nginx) in a container and have its ports mapped through the docker API endpoint (which is a popular application to test/demo with) , we cannot do this at the moment.
  2. You saw the DNS encoding errors in the VCH create flow – these are cosmetic and can be ignored. These will get fixed.
  3. The gateway CIDR works with /16 but not /24. Stick with a /16 CIDR for the moment for your testing.
With those items in mind, hopefully there is enough information here to allow you to get some experience with container networks in VIC. Let us know if you run into any other issues.

The post Container Networks in VIC 0.4.0 appeared first on CormacHogan.com.
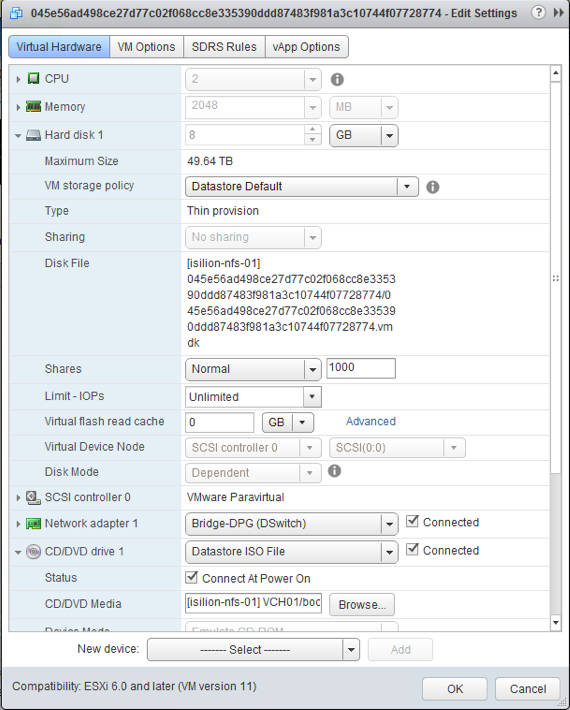
Upcoming #vBrownBag EMEA Appearance – July 26th at 7pm BST

$
0
0

vbrownbagAs my take-3 tenure in the VMware Cloud Native Apps (CNA) team draws to a close, the guys over at #vBrownBag have kindly invited me to come on their show and talk about the various VMware project and initiatives that I have been lucky enough to be involved with. All going well, I hope to be able to demonstrate the Docker Volume Driver for vSphere, some overview of Photon Controller CLI and Photon Platform with Docker Swarm, and maybe Kubernetes as well as some vSphere Integrated Containers (VIC). If you are interested, you can register here. I’d be delighted if you can make it. The show is on at 7pm (local time) tomorrow, Tuesday July 26th. See you there.

The post Upcoming #vBrownBag EMEA Appearance – July 26th at 7pm BST appeared first on CormacHogan.com.


Using vSphere docker volume driver to run Project Harbor on VSAN

$
0
0

harborProject Harbor is another VMware initiative in the Cloud Native Apps space. In a nutshell, it allows you to store and distributes Docker images locally from within your own infrastructure. While Project Harbor provides security, identity and management of images, it also offers better performance by having the registry closer to the build and run environment for image transfers. Harbor also supports multiple deployments so that you can have images replicated between them for high availability. You can get more information (including the necessary components) about Project Harbor on github.

In this post, we will deploy Project Harbor in Photon OS, and then create some docker volumes on Virtual SAN using the docker volume driver for vSphere. This will provide an additional layer of availability for your registry and images, because if one of the physical hosts in your infrastructure hosting Project Harbor fails, there is still a full copy of the data available. Special thanks to Haining Henry Zhang of our Cloud Apps team for helping me understand this process.

I’m not going to explain how to get started with Project Harbor – my colleague Ryan Kelly has already done a really good job with that on his blog post here. But don’t do that just yet, as we have to make some changes to the configuration first for these VSAN Volumes.

One thing I will point out however is that the “docker-compose up -d” command initially failed on my setup with a freshly deployed Photon OS 1.0 GA (full) deployment:

ERROR: for proxy  driver failed programming external connectivity \
on endpoint deploy_proxy_1 \
(0d440744b58f701bfe85657bd17a8bbe3fe455574a21494dfee793ea5d79b17e): \
Error starting userland proxy: listen tcp 0.0.0.0:80: listen: \
address already in use
Traceback (most recent call last):
  File "<string>", line 3, in <module>
  File "compose/cli/main.py", line 63, in main
AttributeError: 'ProjectError' object has no attribute 'msg'
docker-compose returned -1

This was due to the httpd service already running on the full deployment of Photon OS. Using service httpd stop, I was then able to rerun the “docker-compose up -d” command and the deployment was able to succeed.

Using persistent volumes on VSAN for Project Harbor storage

By default, Harbor stores images on a local filesystem in the VM/appliance where it is launched. While you can use other storage back-ends instead of the local filesystem (e.g. S3, Openstack Swift, Ceph, etc), in this post, we want to use a docker volume that resides on the VSAN datastore. We can use the docker volume driver for vSphere to do just that. Once the driver (vmdk)  has been installed on the Photon OS VM and ESXi hosts where we plan to run Project Harbor (see previous link), we need to do the following:

Step 1: Create 3 volumes on VSAN

There are 3 volumes needed for Project Harbor. There first is for the registry, the second for the mysql database, and the third is for the job service. As you can see below, no policies are set when we create our docker volumes on VSAN so that means that the default of FTT=1 (failures to tolerate = 1) is used for the volumes (a replica copy of the data is created on the VSAN cluster). If you want to use different policies, you can append the option “-o vsan-policy=” to the command line.

root@harbor-photon [ /workspace/harbor/Deploy ]# docker volume create \
--driver=vmdk --name registry-vsan -o size=20gb
registry-vsan

root@harbor-photon [ /workspace/harbor/Deploy ]# docker volume create \
--driver=vmdk --name mysql-vsan -o size=20gb
mysql-vsan

root@harbor-photon [ /workspace/harbor/Deploy ]# docker volume create \
--driver=vmdk --name jobservice-vsan -o size=20gb 
jobservice-vsan

root@harbor-photon [ /workspace/harbor/Deploy ]# docker volume ls
DRIVER VOLUME NAME
vmdk jobservice-vsan
vmdk mysql-vsan
vmdk registry-vsan


By the way, I just chose a few small sizes for this demo. If you plan to have lots of images, you may need to consider a much larger size (TBs)  for the registry volume. 20GB should be more than enough for the MYSQL volume as it should not grow beyond that. The jobservices volume is for replication logging, so we estimate that a few 100GB should be enough there.

Step 2: Update the docker-compose.yml

This file is used by docker-compose to setup the Project Harbor deployment. It is in the Deploy folder of Project harbor. We need to change the references to the volumes used by the services mentioned previously. Below you can see the default entries, and then what you need to change them to. We are simply changing the volumes from local filesystem (/data) to our new volumes just created above:

1. registry
from

 volumes:
      - /data/registry:/storage
      - ./config/registry/:/etc/registry/

to

volumes:
      - registry-vsan:/storage
      - ./config/registry/:/etc/registry/

2. mysql
from

 volumes:
       - /data/database:/var/lib/mysql

to

 volumes:
       - mysql-vsan:/var/lib/mysql

3. jobservice
from

 volumes:
       - /data/job_logs:/var/log/jobs
       - ./config/jobservice/app.conf:/etc/jobservice/app.conf

to

 volumes:
       - jobservice-vsan:/var/log/jobs
       - ./config/jobservice/app.conf:/etc/jobservice/app.conf

There is one more change to be made to the docker-compose.yml file. We need to include a new section at the end of the .yml file to tell docker-compose about our new volumes, as follows:

volumes:
  registry-vsan:
    external: true
  mysql-vsan:
    external: true
  jobservice-vsan:
    external: true

It is important to ensure that “volumes:” line starts at the beginning of the line in the .yml config file. The name of the datastore on the next line is then two spaces from the start of line, and the external: directive on the following line is 2+2 (4) spaces from the start of the line. Otherwise the docker-compose command will complain about formatting.

Step 3: docker-compose build and docker-compose up

Now we rebuild an updated/new Project Harbor environment with these new volumes in place, and when that succeeds, we can bring Project Harbor up. I won’t paste the output of the build here as it is rather long.

root@harbor-photon [ /workspace/harbor/Deploy ]# docker-compose build
.
.
.
root@harbor-photon [ /workspace/harbor/Deploy ]# docker-compose up -d
Creating network "deploy_default" with the default driver
Creating deploy_log_1
Creating deploy_ui_1
Creating deploy_registry_1
Creating deploy_mysql_1
Creating deploy_jobservice_1
Creating deploy_proxy_1
root@harbor-photon [ /workspace/harbor/Deploy ]#

Step 4: Verify volumes are in use

To verify that the volumes are indeed being used by Project Harbor services, we can use the “docker inspect” option to look at some of the containers running Project Harbor. In this case, I am looking at the registry container:

root@harbor-photon [ /workspace/harbor/Deploy ]# docker ps
 CONTAINER ID IMAGE COMMAND CREATED STATUS PORTS NAMES
 33b9f0342ab4 library/nginx:1.9 "nginx -g 'daemon off" 23 minutes ago Up ...
 9a857225576d deploy_jobservice "/go/bin/harbor_jobse" 23 minutes ago Up ...
 d7555469a4e9 deploy_mysql "docker-entrypoint.sh" 23 minutes ago Up ...
 a315d0bffbf6 library/registry:2.4.0 "/bin/registry serve " 23 minutes ago Up ...
 0ad826b8a11d deploy_ui "/go/bin/harbor_ui" 23 minutes ago Up ...
 d66d1cf81172 deploy_log "/bin/sh -c 'cron && " 23 minutes ago Up ...

root@harbor-photon [ /workspace/harbor/Deploy ]# docker inspect \
a315d0bffbf6 | grep -A 10 Mounts
  "Mounts": [
  {
 "Name": "registry-vsan",
 "Source": "/mnt/vmdk/registry-vsan",
 "Destination": "/storage",
 "Driver": "vmdk",
 "Mode": "rw",
 "RW": true,
 "Propagation": "rprivate"
 },
 {


In the above example, you can see the source is our “registry-vsan” volume, and that the driver is “vmdk” which is the docker volume driver for vSphere. Looks good.

Now lets take a look at the volumes that are currently attached to the Photon OS appliance where we are running Project Harbor. We should be able to see the original appliance volumes, and there should now be 3 additional VSAN volumes used by Project Harbor. We can also verify the policy associated with them, which should be FTT=1 (RAID-1 mirror). This is another sure sign that containers running in this VM are using the volumes.

harbor-vsan-vols

Now, since this VM/appliance (Photon OS) is already deployed on VSAN, well, you already have the benefits of VSAN availability. But you now have greater control over which Project Harbor containers/services are using which volumes.

The post Using vSphere docker volume driver to run Project Harbor on VSAN appeared first on CormacHogan.com.

Project Harbor in action

$
0
0

harborA short time back, I showed you how to change the Project Harbor configuration to use persistent storage provided by docker volume driver for vSphere and save your images on Virtual SAN. In this post, I will show you how to use Project Harbor by adding a new user to Harbor, create a new project for this user, login to Harbor via docker, and then push and pull image from the Project Harbor repo. While these instructions are simplified just to get you started, you should refer to the official project hard documentation which is available on the github site. The user guide can be found here.

Step 1: Verify UI Login is successful

The default credentials are admin/harbor12345. These can be changed once logged in. But at the very least you should check that you can login here before trying to push/pull images.

harbor - login screenStep 2: Create a new user (if desired)

I decided to create a new user called ops for this demo.

harbor - add userI then verified that I could login as that user – always a good thing to do 🙂

harbor - new user loginStep 3: Create a project for the new user

I called the project “ops-repo”. My images will appear here. By the way, even if you are using an admin user, you will still need to create a project.

harbor - create new projharbor - new proj createdIt is now time to push and pull images to this repo. This is done from the docker command line.

Step 4: Set login to use port 80

In the following output, you can see a number of attempts to login to the registry. The first thing I did was to create a DOCKER_OPTS environment variable which enables insecure access on port 80. You can see initially that the login is attempted on port 443. On restarting docker, it attempts port 80, but it is only after doing a docker-compose down, then up, that the login actually succeeds. These initial tests were done with the admin user.

# env | grep DOCKER
DOCKER_OPTS=--insecure-registry 10.27.51.39

# docker login -u admin -p harbor12345 10.27.51.39
Error response from daemon: Get https://10.27.51.39/v1/users/: 
dial tcp 10.27.51.39:443: getsockopt: connection refused

# systemctl restart docker

# docker login -u admin -p harbor12345 10.27.51.39

Error response from daemon: Get http://10.27.51.39/v1/users/: 
dial tcp 10.27.51.39:80: getsockopt: connection refused

# docker-compose down
Removing deploy_proxy_1 ... done
Removing deploy_jobservice_1 ... done
Removing deploy_mysql_1 ... done
Removing deploy_registry_1 ... done
Removing deploy_ui_1 ... done
Removing deploy_log_1 ... done
Removing network deploy_default

# docker-compose up -d
Creating network "deploy_default" with the default driver
Creating deploy_log_1
Creating deploy_ui_1
Creating deploy_mysql_1
Creating deploy_registry_1
Creating deploy_jobservice_1
Creating deploy_proxy_1

# docker login -u admin -p harbor12345 10.27.51.39
Login Succeeded

Login is now working. Let’s try to push an image to the repo using docker push.

Step 5: Push an image to the repo in Project Harbor

In this example, I am pulling down an image called nginx from the docker hub, tagging it, and pushing it out to my Project Harbor repo:

# docker pull nginx
Using default tag: latest
latest: Pulling from library/nginx
51f5c6a04d83: Already exists
a3ed95caeb02: Pull complete
51d229e136d0: Pull complete
bcd41daec8cc: Pull complete
Digest: sha256:0fe6413f3e30fcc5920bc8fa769280975b10b1c26721de956e1428b9e2f29d04
Status: Downloaded newer image for nginx:latest

# docker images | grep nginx | grep latest
nginx               latest              0d409d33b27e        \
9 weeks ago         182.7 MB

# env | grep DOCKER
DOCKER_OPTS=--insecure-registry 10.27.51.39

# docker login -u ops 10.27.51.39
Password:
Login Succeeded

# docker tag 0d409d33b27e cormac-nginx:latestdocker tag cormac-nginx:latest 10.27.51.39/ops-repo/cormac-nginx:latest

# docker push 10.27.51.39/ops-repo/cormac-nginx:latest
The push refers to a repository [10.27.51.39/ops-repo/cormac-nginx]
5f70bf18a086: Mounted from corproj1/cormac-nginx
bbf4634aee1a: Mounted from corproj1/cormac-nginx
64d0c8aee4b0: Mounted from corproj1/cormac-nginx
4dcab49015d4: Mounted from corproj1/cormac-nginx
latest: digest: \
sha256:0fe6413f3e30fcc5920bc8fa769280975b10b1c26721de956e1428b9e2f29d04\
 size: 1956
#

# docker images | grep cormac
10.27.51.39/ops-repo/cormac-nginx   latest              0d409d33b27e \
     9 weeks ago         182.7 MB


Step 6: Review repo on UI

We can now see the image in our repo in Project Harbor.

harbor - image uploadedStep 7: Pull the image from Project Harbor

In this example, I will remove the image locally, and then pull it from the Project Harbor repo.

# docker images | grep cormac
10.27.51.39/ops-repo/cormac-nginx   latest              \
 0d409d33b27e        9 weeks ago         182.7 MB

# docker rmi -f 0d409d33b27e
Untagged: 10.27.51.39/ops-repo/cormac-nginx:latest
Untagged: nginx:latest
Deleted: sha256:0d409d33b27e47423b049f7f863faa08655a8c901749c2b25b93ca67d01a470d
Deleted: sha256:894e1c82ec1396d0d30c0f710d0df5ae5f8dc543e53cca3f92d305fe09370282
Deleted: sha256:26fdf3d8f16c52bcf3c6b363739bda3c9531e394427d09d7118446914eedae02
Deleted: sha256:2254f56d1c260b47ea426e484164f7ef161310ef7d8a089d3a2f86a31fcd575f
Deleted: sha256:f75463f4fa42454f52336dcab2c98ed51c3466db347c2bc4e210d708645e77f2

# docker images | grep cormac

# docker pull 10.27.51.39/ops-repo/cormac-nginx:latest
latest: Pulling from ops-repo/cormac-nginx
51f5c6a04d83: Already exists
a3ed95caeb02: Pull complete
51d229e136d0: Pull complete
bcd41daec8cc: Pull complete
Digest: sha256:0fe6413f3e30fcc5920bc8fa769280975b10b1c26721de956e1428b9e2f29d04
Status: Downloaded newer image for 10.27.51.39/ops-repo/cormac-nginx:latest

# docker images | grep cormac
10.27.51.39/ops-repo/cormac-nginx   latest             \
 0d409d33b27e        9 weeks ago         182.7 MB
#

Step 8: Do the images still work?

Let’s fire up the nginx image. I chose port 8000 as the port map since Project Harbor is already running another nginx image on port 80.

# docker run -d -p 8000:80 0d409d33b27e
82759d82e6dc0917ea519ffd96866a67c6b28dc124892b1b647532f61257cf47
#

welcome to nginxLooks good to me!

The post Project Harbor in action appeared first on CormacHogan.com.

VMware Cloud Native App Projects – courtesy of vBrownBag

$
0
0

vbb_logoEarlier last month, I was invited onto the #vBrownBag podcast to give an overview of my experiences with the various ongoing VMware Cloud Native App (CNA) projects. I had a great chat with Gregg Robertson, and demonstrated a number of things that we are working on. I noticed this morning that the recording is now live, so if you are interested in some of the things we are doing in the CNA space, I’d recommend taking a look. I’ve embedded the video here:

If you want to learn more, there are some links to the various projects and source codes here:

Also, if you happen to be in the Manchester, UK area, I will be talking about these projects at the North West UK VMUG on Wednesday (14th Sep) and the TechUG conference on Thursday (15th Sep). More details here. Hope to see you at one of those.

For other folks in EMEA, I will be at some upcoming VMUGs, hoping to present on the same topic. I’ll follow up with a post once everything has been finalised.


The post VMware Cloud Native App Projects – courtesy of vBrownBag appeared first on CormacHogan.com.
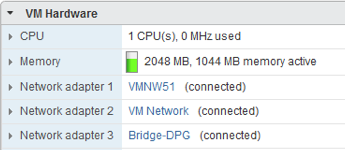
Nice simple demo – Nginx running on VIC

$
0
0

vicIt’s been a number of weeks since I last looked at vSphere Integrated Containers. When I last looked at v0.4.0, one of the issues had been with port mapping not working. This was a bit of a drag, as in the case of web servers running in containers, you’d definitely want this to function. One of the most common container demos is to show Nginx web server running in a container, and port mapping back to the container host, so that you could point to the IP of the container host, and connect to the web server. I recently got access to v0.6.0, which has a whole bunch of improvements, and it also has working port mapping. So to demonstrate this, I thought I’d show off Nginx running in VIC.

Bridge Network Considerations

First of all, you need to verify that your Bridge Network is set up correctly. When using vCenter Server as a target for VIC, a distributed port group on a distributed switch (DVS) needs to be created. Now you must also make sure that the DVS on which the port group resides has correctly configured uplinks and VLAN settings to allow the containers on each host to communicate (if necessary), but also to make sure that the containers can communicate back to the Virtual Container Host. This can be confusing, because if the DVS or dvportgroup is mis-configured, containers on the same host can still communicate, but containers on different hosts cannot. This has caught a few folks out.

Deploying the Virtual Container Host

I’m doing a simple deployment here with the minimal options. In the example below, I am specifying the bridge network (dvportgroup), an image store for container images, a compute resource, typically a resource pool, and the vCenter server and privileges. There are obviously a lot more settings to the VCH, but this is the simplest deployment of the VCH. As you can see below, there are 3 x ESXi hosts in my cluster.

# ./vic-machine-linux create --bridge-network Bridge-DPG \
--image-store isilion-nfs-01 \
-t 'administrator@vsphere.local:VMware123!@10.27.51.103' \
--compute-resource Mgmt
INFO[2016-09-21T13:20:52Z] ### Installing VCH ####
INFO[2016-09-21T13:20:52Z] Generating certificate/key pair - \
private key in ./virtual-container-host-key.pem
INFO[2016-09-21T13:20:53Z] Validating supplied configuration
INFO[2016-09-21T13:20:53Z] vDS configuration OK on "Bridge-DPG"
INFO[2016-09-21T13:20:53Z] Firewall status: DISABLED on "/CNA-DC/host/Mgmt/10.27.51.10"
INFO[2016-09-21T13:20:53Z] Firewall status: DISABLED on "/CNA-DC/host/Mgmt/10.27.51.8"
INFO[2016-09-21T13:20:53Z] Firewall status: DISABLED on "/CNA-DC/host/Mgmt/10.27.51.9"
INFO[2016-09-21T13:20:53Z] Firewall configuration OK on hosts:
INFO[2016-09-21T13:20:53Z]   "/CNA-DC/host/Mgmt/10.27.51.10"
INFO[2016-09-21T13:20:53Z]   "/CNA-DC/host/Mgmt/10.27.51.8"
INFO[2016-09-21T13:20:53Z]   "/CNA-DC/host/Mgmt/10.27.51.9"
INFO[2016-09-21T13:20:53Z] License check OK on hosts:
INFO[2016-09-21T13:20:53Z]   "/CNA-DC/host/Mgmt/10.27.51.10"
INFO[2016-09-21T13:20:53Z]   "/CNA-DC/host/Mgmt/10.27.51.8"
INFO[2016-09-21T13:20:53Z]   "/CNA-DC/host/Mgmt/10.27.51.9"
INFO[2016-09-21T13:20:53Z] DRS check OK on:
INFO[2016-09-21T13:20:53Z]   "/CNA-DC/host/Mgmt/Resources"
INFO[2016-09-21T13:20:54Z] Creating virtual app "virtual-container-host"
INFO[2016-09-21T13:20:54Z] Creating appliance on target
INFO[2016-09-21T13:20:54Z] Network role "client" is sharing NIC with "external"
INFO[2016-09-21T13:20:54Z] Network role "management" is sharing NIC with "external"
INFO[2016-09-21T13:20:55Z] Uploading images for container
INFO[2016-09-21T13:20:55Z]      "appliance.iso"
INFO[2016-09-21T13:20:55Z]      "bootstrap.iso"
INFO[2016-09-21T13:20:58Z] Registering VCH as a vSphere extension
INFO[2016-09-21T13:21:06Z] Waiting for IP information
INFO[2016-09-21T13:21:20Z] Waiting for major appliance components to launch
INFO[2016-09-21T13:21:26Z] Initialization of appliance successful
INFO[2016-09-21T13:21:26Z]
INFO[2016-09-21T13:21:26Z] vic-admin portal:
INFO[2016-09-21T13:21:26Z] https://10.27.51.32:2378
INFO[2016-09-21T13:21:26Z]
INFO[2016-09-21T13:21:26Z] DOCKER_HOST=10.27.51.32:2376
INFO[2016-09-21T13:21:26Z]
INFO[2016-09-21T13:21:26Z] Connect to docker:
INFO[2016-09-21T13:21:26Z] docker -H 10.27.51.32:2376 --tls info
INFO[2016-09-21T13:21:26Z] Installer completed successfully
#
I now have my docker API endpoint – 10.27.51.32:2376 – so I can now begin to deploy containers. Let’s start with an Nginx container. The “-d” flag runs the container in the background, and the -p 80:80 maps port 80 from the container to port 80 on the container host (VCH), i.e. if you connect to port 80 on the VCH, it maps to port 80 on the container.

# docker -H 10.27.51.32:2376 --tls run -d -p 80:80 nginx
Unable to find image 'nginx:latest' locally
Pulling from library/nginx
a3ed95caeb02: Pull complete
8ad8b3f87b37: Pull complete
c6b290308f88: Pull complete
f8f1e94eb9a9: Pull complete
Digest: sha256:c22da5920a912f40b510c65b34c4fcd0fb75e6ad9085ea4939bcda2a6231a036
Status: Downloaded newer image for library/nginx:latest
9f3570e1859aec2c2fec1816754cbe387c7223412819830b062baf50ac22ab11
And lets see if it is running successfully:

# docker -H 10.27.51.32:2376 --tls ps -a
CONTAINER ID IMAGE COMMAND CREATED STATUS PORTS NAMES
9f3570e1859a nginx "nginx -g daemon off;" 26 seconds ago Running condescending_jones
#
All looks good so far. Now to see if we can connect to the web server (Nginx) running in the container using the VCH IP address and port. This is the same IP address as the one used for docker endpoint, but the web server has been mapped to port 80, whereas the docker endpoint is using port 2376.
The final test is to ensure that we can connect to the web server. The easiest way is to launch a browser, and in my case point to http://10.27.51.32:80. You should see the following if port mapping is working correctly:

nginxA nice demo of Nginx running as a container on VIC. And of course the nice thing about VIC, in case you didn’t know, is visibility into the container. You can see resources, networking and storage details from the web client. No more black-box containers:

vic-containersIf you’d like to try out VIC v0.6.0, you can get it on github, or download the binaries from bintray. You can also get the latest documentation here. If you want more direction, and want to help shape the future of vSphere Integrated Containers, sign up for the beta here.

The post Nice simple demo – Nginx running on VIC appeared first on CormacHogan.com.

Nginx running on VIC (short video)

$
0
0

I put together this short vSphere Integrated Containers v0.6.0 video (~4 minutes) showing how you can deploy a container running a web server, in this case Nginx, and have its ports mapped back to the Container Host (VCH), allowing you to access the web server from the VCH. This is to coincide with a blog that I posted earlier on the same topic. Check that out for additional details.

If you’d like to try out VIC v0.6.0, you can get it on github, or download the binaries from bintray. You can also get the latest documentation here. If you want more direction, and want to help shape the future of vSphere Integrated Containers, sign up for the beta here.

The post Nginx running on VIC (short video) appeared first on CormacHogan.com.

Docker Volume Driver for vSphere using policies on VSAN (short video)

$
0
0

This is a short demo (< 5 minutes) which highlights how one can use storage policies to manage the creation of a docker volume when that volume is being deployed on Virtual SAN. This does not cover the installation of the components required, as these have been covered here and there is another short video covering those steps here. Also, my good buddy William Lam has great step by step instructions on how to use VSAN policies for container volumes in his blog post here. This video just takes a very quick look at how the docker volume driver for vSphere can leverage policy settings when creating a volume on VSAN.

The post Docker Volume Driver for vSphere using policies on VSAN (short video) appeared first on CormacHogan.com.

Photon Controller v1.0 is available

$
0
0

PHOTON_square140Photon Controller version 1.0 was released very recently. Ryan Kelly provides a good overview of what has changed in the UI from previous releases in his blog post here. I got a chance to deploy out the new version just recently, and took a look at a few things which have changed from a deployment perspective. As Ryan states in his blog, the deployment UI is still very much the same. However, under the covers, things are a little different.

Photon Controller Installer Containers

It seems that there has been a reduction in the number of containers that are used by the installer. The installer, or the ESXCloud Management VM, is responsible for prepping the ESXi hosts and for deploying out the photon controllers themselves. When I last looked, there were a number of containers in the installer VM, such as esxcloud/installer_ui, esxcloud/cloud-store, esxcloud/housekeeper, esxcloud/deployer, esxcloud/management-api and esxcloud/zookeeper. Now there are only two containers on the installer, esxcloud/installer_ui  and esxcloud/photon-controller-core. So it looks like much of the installer functionality has been condensed into one container, the photon-controller-core. The UI functionality is still provided by the esxcloud/installer_ui container.

Resetting the Installer to defaults

Because of this change, the information around the deployment is now held in a new location. In previous versions, if something was mis-configured and the deployment failed, you could reset the installer by following the instructions in this blog post here. In version 1.0, disappointingly there is still no rollback mechanism on a failed deploy. Your options are to create a snapshot of the installer and revert to the previous image if the deployment fails. If you forget to do this, which is something I always forget to do, you can reset the installer by:

  1. Login to the installer VM as esxcloud
  2. sudo to superuser
  3. rm /etc/esxcloud/photon-controller-core/cloud-store/sandbox*
  4. reboot the installer VM
  5. Login back into the installer VM as esxcloud
  6. Restart the esxcloud/installer_ui container via docker restart

Now you should be able to begin the deployment of Photon Controller once more. Unfortunately, as you can see from step 6, the installer_ui container is still not started automatically on reboot, so you will have to login and start this manually as before.

I’m not aware of any other changes, but if I run into anything different whilst rolling out the orchestration frameworks such as K8S and Mesos, I’ll be sure to let you know.

The post Photon Controller v1.0 is available appeared first on CormacHogan.com.


Task “CREATE_VM”: step “RESERVE_RESOURCE” failed with error code “NetworkNotFound”

$
0
0

PHOTON_square140I mentioned yesterday that Photon Controller version 1.0 is now available. I rolled it out yesterday, and just like I did with previous versions, I started to deploy some frameworks on top. My first task was to put a Mesos framework on top on Photon Controller. I’d done this many times before, and was able to successfully roll out this same framework with the exact same settings on Photon Controller v0.9. But yesterday I hit the following error when creating my cluster:

cormac@cs-dhcp32-29:~$ photon cluster create -n mesos -k mesos --dns 10.27.51.252 \
--gateway 10.27.51.254\ --netmask 255.255.255.0 --zookeeper1 10.27.51.118 -s 2 
Using target 'http://10.27.51.117' 
Zookeeper server 2 static IP address (leave blank for none):   
Creating cluster: mesos (MESOS)   
Slave count: 2   
Are you sure [y/n]? y 

2016/09/27 14:59:54 photon: Task 'eb2a1acd-e6f6-4ecb-b6bc-b6b35f7b4ded' is in \ 
error state: {@step=={"sequence"=>"1","state"=>"ERROR","errors"=>[photon: { \ 
HTTP status: '0', code: 'InternalError', message: 'Failed to rollout \ 
MesosZookeeper. Error: MultiException[java.lang.IllegalStateException: \ 
VmProvisionTaskService failed with error [Task "CREATE_VM": step "RESERVE_RESOURCE" \ 
failed with error code "NetworkNotFound", message "Network default (physical) \
not found"]. /

photon/clustermanager/vm-provision-tasks/79e4229c-361a-4cc9-9926-\ 
fd8dff13d114]', data: 'map[]' }],"warnings"=>[],"operation"=>"CREATE_MESOS_CLUSTER\ 
_SETUP_ZOOKEEPERS","startedTime"=>"1474984788404","queuedTime"=>"1474984788388",\ 
"endTime"=>"1474984793408","options"=>map[]}} 

API Errors: [photon: { HTTP status: '0', code: 'InternalError', message: 'Failed \ 
to rollout MesosZookeeper. Error: MultiException[java.lang.IllegalStateException: \ 
VmProvisionTaskService failed with error [Task "CREATE_VM": step "RESERVE_RESOURCE" \ 
failed with error code "NetworkNotFound", message "Network default (physical) \
not found"]. /photon/clustermanager/vm-provision-tasks/79e4229c-361a-4cc9-9926-\ 
fd8dff13d114]', data: 'map[]' }]

I wasn’t sure what this the error was – I certainly had not encountered it before: Network default (physical) not found? I spoke to some of the Photon Controller engineers, and they mentioned that the API semantics around networks changed slightly in Photon Controller v1.0. Now, when deploying a cluster, you can either create a default network beforehand, or specify it when creating the cluster using the new –network_id option on the command line. To create a default network, you can use the following as an example. Here I am making the “VM Network” the default network:

cormac@cs-dhcp32-29:~$ photon network create --name vm-network -p "VM Network"
8eb5e3d8-3b06-4743-94ce-8c8b1034331c
cormac@cs-dhcp32-29:~$ photon network set-default 8eb5e3d8-3b06-4743-94ce-8c8b1034331c

You will need to get the latest photon controller cli to use the set-default argument however. This is available on github. If you wish to specify the –network_id on the command line, which is what I decided to do, you can do the following:

cormac@cs-dhcp32-29:~$ photon network create --name vm-network -p "VM Network"
Description of network: "VM Network"
Using target 'http://10.27.51.117'
CREATE_NETWORK completed for 'subnet' entity 180246d4-e125-4faa-8b72-716b1d57102e

cormac@cs-dhcp32-29:~$ photon network list
Using target 'http://10.27.51.117'
ID Name State PortGroups Descriptions
180246d4-e125-4faa-8b72-716b1d57102e vm-network READY [VM Network] "VM Network"
Total: 1

cormac@cs-dhcp32-29:~$ photon cluster create -n mesos -k mesos --dns 10.27.51.252 \
--gateway 10.27.51.254 --netmask 255.255.255.0 --zookeeper1 10.27.51.118 -s 2 \
--network_id 180246d4-e125-4faa-8b72-716b1d57102e
Using target 'http://10.27.51.117'
Zookeeper server 2 static IP address (leave blank for none):

Creating cluster: mesos (MESOS)
 Slave count: 2

Are you sure [y/n]? y
CREATE_CLUSTER completed for 'cluster' entity 3aeb3062-b0dc-4399-ab65-155bf6e0ebc2
Note: the cluster has been created with minimal resources. You can use the cluster now.
A background task is running to gradually expand the cluster to its target capacity.
You can run 'cluster show ' to see the state of the cluster.

And just to confirm that the Mesos cluster did indeed deploy successfully:

cormac@cs-dhcp32-29:~$ photon cluster show 3aeb3062-b0dc-4399-ab65-155bf6e0ebc2
Using target 'http://10.27.51.117'
Cluster ID: 3aeb3062-b0dc-4399-ab65-155bf6e0ebc2
 Name: mesos
 State: READY
 Type: MESOS
 Slave count: 2
 Extended Properties: map[netmask:255.255.255.0 dns:10.27.51.252 \
 zookeeper_ips:10.27.51.118 gateway:10.27.51.254]

VM ID VM Name VM IP
0f789d45-567b-4145-81b6-f0f840d325ff \
master-e6078abe-95fa-43f4-accc-96c6fc6dbf5e 10.27.51.95
5beddbc4-d7b7-4972-9508-631796d41693 \
master-69900ba2-999b-4dea-b09d-2f6c6a0735f0 10.27.51.99
6cbe983f-f6c3-4450-92b2-52a37b82bee4 \
master-8f228fa3-9327-40fd-bab8-71aad70db916 10.27.51.98
df7ecb03-da0a-4d48-ab2c-3c245d2129c7 \
zookeeper-828a315d-7d82-4065-9107-fa9e567aad45 10.27.51.118
f5473630-ec4f-439c-ad0c-31555dc4aaf7 \
marathon-5aafbb4a-fb7c-4289-b377-94639e482ad1 10.27.51.101
cormac@cs-dhcp32-29:~$

And now if I browse to a master on port 5050 or the marathon VM on port 8080, I should see everything up and running. First is the Mesos master (you can connect to any of them):

mesos-masterAnd the next is the marathon framework which is included in this distro:

marathonAll looks good. So just to recap, some of the network semantics have changed in Photon Controller 1.0, so if you run into an issue, hopefully this post will help you out.

The post Task “CREATE_VM”: step “RESERVE_RESOURCE” failed with error code “NetworkNotFound” appeared first on CormacHogan.com.
Some nice enhancements to Docker Volume Driver for vSphere v0.7

$
0
0

dockerThis week I am over at our VMware HQ in Palo Alto. I caught up with the guys in our storage team who are working on our docker volume driver for vSphere to find out what enhancements they have made with version 0.7. They have added some cool new enhancements which I think you will like.

First, this has been designed specifically for docker version 1.12. So the first thing you will have to do is to make sure that your docker is at this latest version. For most distros, this is quite a simple thing to do. But since I predominantly use our Photon OS distro, which ships with docker version 1.11 currently, there are a few additional steps to consider. To update the version of docker on Photon OS, you can use the following steps:

Step 1. Make a backup of /etc/yum.repos.d/photon-dev.repo and then add the following stanza of text to the original:

[photon-dev]
name=VMware Photon Linux Dev(x86_64)
baseurl=https://dl.bintray.com/vmware/photon_dev_$basearch
gpgkey=file:///etc/pki/rpm-gpg/VMWARE-RPM-GPG-KEY
gpgcheck=1
enabled=1
skip_if_unavailable=True

Step 2. Run  the following command to update docker:

tdnf install --refresh docker

Step 3. Make a backup of /usr/lib/systemd/system/docker-containerd.service and the edit the original to modify the “ExecStart” section. Replace it with the following:

ExecStart=/usr/bin/docker-containerd --listen 
unix:///run/containerd.sock --runtime /usr/bin/docker-runc 
--shim /usr/bin/docker-containerd-shim
 Step 4. Run the following commands:
systemctl daemon-reload

systemctl restart docker

Step 5. Verify that the docker version is at v1.12 and is functioning:

docker –v

docker ps

docker volume ls 

OK. Now I can proceed with the installation of docker volume driver version 0.7.

The installation process is still the same as before. There are two components; the VIB and the RPM. You need to install the VIB on the ESXi host, and you need to install the Guest OS component as well. The binaries are available for download on github to get you started quickly. But you can also built it yourself. This time I pulled down the latest build from github to my Photon OS VM using “git clone”, and I built the components on my Photon OS. If you want to do the same on your Photon OS, here are the steps:

Step 1. Install git using the following command

tdnf install git

Step 2. Clone the docker volume driver repo

git clone https://github.com/vmware/docker-volume-vsphere.git

Step 3. Install the make utility

tdnf install make

Step 4. Make sure docker is running in Photon OS. The build steps uses docker.

systemctl start docker
systemctl enable docker

Step 5. Build the code

cd docker-volume-vsphere/
make

Step 5. Install the RPM on Photon OS

cd build
rpm -ivh docker-volume-vsphere-0.7.8d42baa-1.x86_64.rpm

Step 6. restart docker

systemctl restart docker

Step 7. Copy the VIB to the ESXi host on which your Photon OS resides, and install it. The following command is run from the ESXi host, not the Photon OS, after the VIB was copied from the build folder on my Photon OS guest to the /scratch/downloads on the ESXi host:

 esxcli software vib install -d \
/scratch/downloads/vmware-esx-vmdkops-0.7.8d42baa.zip \
--no-sig-check -f

Now we can look at some of the enhancements in this newer version. First, there are some new field in the volume view from the ESXi host. Here is how things used to look in the previous version of the driver:

docker-vol-drvr-v0-7This is how they look now, with the additional fields:

docker-volume-driver-v0-7-newThere are a few new fields such as filesystem type, access mode and attachment mode. I’ll discuss these in just a moment.

There are some nice new enhancements to the “docker volume create” commands from within the Guest OS too. There is now a much nicer and more comprehensive help output if you make a typo/mistake. For example:

root@photon [ ~ ]# docker volume create -d vmdk \
-o bad_opt=bad_val
Error response from daemon: create 
.....: 
Valid options and defaults: 
[('size', '100mb'), 
('vsan-policy-name', '[VSAN default]'), 
('diskformat', 'thin'), 
('attach_as', 'independent_persistent')]
root@photon [ ~ ]#

There are a few things to highlight here.

  1. You can now select which filesystem to place on the volume, so long as the Guest OS supports it. This defaults to “ext4”.
  2. You can create Thin, LazyZeroedThick or EagerZeroedThick volumes. This defaults to thin.
  3. You can specify a VSAN policy, which I highlighted in a previous post here. If you do not specify a policy when creating volumes on VSAN, it uses the default policy.
  4. You can attach volumes as independent persistent, meaning that they can now be snapshot’ed for the purposes of backup. More on disk formats can be found here. The default is independent_persistent, meaning that no snapshot is created during backups, meaning that this volume is not backed up.

So lets create some new volumes for containers from my Photon OS Guest OS. I will create 3 volumes in total, with different specifications.

Volume 1 – Create a volume that is on the same datastore as my Photon OS VM, with a size of 10GB (which is a VSAN datastore by the way). Everything is default.

root@photon [ / ]# docker volume create --driver=vmdk \
--name=testvol1 -o size=10gb

testvol1

Volume 2 – Create a volume on my NFS array with a size of 10GB, but make it read-only.

root@photon [ / ]# docker volume create --driver=vmdk \
--name=testvol2@isilion-nfs-01 -o size=10gb -o access=read-only

testvol2@isilion-nfs-01

Volume 3 – Create a volume on my local VMFS datastore, but make it persistent rather than independent-persistent, so I can snapshot it for backup purposes.

root@photon [ / ]# docker volume create --driver=vmdk \
--name=testvol3@esxi-hp-08-local -o size=10gb \
-o attach-as=persistent

testvol3@esxi-hp-08-local

Lets take a look at the docker volume listing:

root@photon [ / ]# docker volume ls
DRIVER              VOLUME NAME
.
.
vmdk                testvol1
vmdk                testvol2@isilion-nfs-01
vmdk                testvol3@esxi-hp-08-local
.
root@photon [ / ]#

Again, in this version of the docker volume driver, testvol1 is not shown with an “@datastore” as it is on the same datastore as the Guest OS. We can use the docker inspect command to show the attributes of a particular volume:

root@photon [ / ]# docker volume inspect testvol2@isilion-nfs-01
[
    {
        "Name": "testvol2@isilion-nfs-01",
        "Driver": "vmdk",
        "Mountpoint": "/mnt/vmdk/testvol2@isilion-nfs-01",
        "Status": {
            "access": "read-only",
            "attach-as": "independent_persistent",
            "capacity": {
                "allocated": "164MB",
                "size": "10GB"
            },
            "created": "Thu Oct  6 14:21:32 2016",
            "created by VM": "Photon-DVD4V",
            "datastore": "isilion-nfs-01",
            "diskformat": "thin",
            "fstype": "ext4",
            "status": "detached"
        },
        "Labels": {},
        "Scope": "global"
    }
]

Finally we can get an overview of all the volumes from an ESXi host perspective.

vmdkops-lsThis is what happens if you attempt to create something on the read-only filesystem.

root@photon [ / ]# docker run -it --rm -v testvol2@isilion-nfs-01:/testvol2 busybox sh
/ # df
Filesystem           1K-blocks      Used Available Use% Mounted on
overlay                8122788   2657456   5029676  35% /
tmpfs                  1026644         0   1026644   0% /dev
tmpfs                  1026644         0   1026644   0% /sys/fs/cgroup
/dev/disk/by-path/pci-0000:0b:00.0-scsi-0:0:0:0
                      10190136     23028   9626436   0% /testvol2
/dev/root              8122788   2657456   5029676  35% /etc/resolv.conf
/dev/root              8122788   2657456   5029676  35% /etc/hostname
/dev/root              8122788   2657456   5029676  35% /etc/hosts
shm                      65536         0     65536   0% /dev/shm
tmpfs                  1026644         0   1026644   0% /proc/sched_debug
/ # cd /testvol2/
/testvol2 # ls
lost+found
/testvol2 # mkdir zzz
mkdir: can't create directory 'zzz': Read-only file system
/testvol2 #

So lots of really great improvements as you can see. If you want to build persistent storage around containers from VMs which are running on vSphere, the docker volume driver for vSphere is the perfect way to do it. You can get all the information you need from the github page – https://vmware.github.io/docker-volume-vsphere/ – and it is also the best place to get help/assistance, or indeed contribute to the project. The team would only be too happy to help.

If you are VMworld in Europe, check out the Storage for Cloud Native Applications session – STO7831 – with Mark Sterin. This takes place on Tuesday, Oct 18, 5:00 p.m. – 6:00 p.m. Mark will demonstrate a lot of the goodness I am talking about here, and some other cool storage/container activities taking place at VMware.

The post Some nice enhancements to Docker Volume Driver for vSphere v0.7 appeared first on CormacHogan.com.
More CNA goodness from VMware – Introducing Admiral

$
0
0

admiralAs I prep myself for some upcoming VMUGs in EMEA, I realized that I hadn’t made any mention on a new product that we recently introduced in the CNA (Cloud Native Apps) space called Admiral. In a nutshell, Admiral is a Container Management platform for deploying and managing container based applications, intended to provide automated deployment and life cycle management of containers. Now, while Admiral can be used to deploy container directly to virtual machines that are running docker (e.g. Photon OS), it can also be used with vSphere Integrated Containers, and you can deploy containers via the VCH (Virtual Container Host). On top of that, Admiral can also be used with Project Harbor container repositories that you may have deployed in your environment. This gives a very nice end-to-end story when using containers with vSphere. Let’s take a closer look.

1. Deploy Admiral

This is very straight-forward. Deploy a VM (in this case, Photon OS), start/enable docker, and deploy Admiral as a container. Note the port mapping of 8282:

[ ~ ]# systemctl start docker
[ ~ ]# systemctl enable docker

[ ~ ]# docker run -d -p 8282:8282 --name admiral vmware/admiral
Unable to find image 'vmware/admiral:latest' locally
latest: Pulling from vmware/admiral
cb261545df3a: Pull complete
49c266ee129c: Pull complete
ce4c0f9e0889: Pull complete
6ca363de293a: Pull complete
df06bdf7edd7: Pull complete
913e27cbda48: Pull complete
Digest: sha256:2bfe48271aa0f1ef5339260ca5800f867f25003521da908e961e59005fdd13a4
Status: Downloaded newer image for vmware/admiral:latest
9de9402a88eb3e31aa26cc4a0aa3d30e6f6c8c1c788db91a0d99f5b3556f171f
[ ~ ]#

Next, open a browser, point it to this VM and port 8282. You should observe the following Admiral landing page:

admiral-landing-page2. Orchestrate container deployments to VIC via Admiral

Let’s now go ahead and add a host. As mentioned, this could be as something as simple as a VM (running docker) that you wish to deploy containers to, but in this example we are going to point it at a VIC deployment. You will need the public and private certificates from your VCH deployment, as well as the docker API endpoint. To get the docker API endpoint provided by a VCH, the following command can be used from the host where the VCH was deployed:

[ /workspace/vic ]# ./vic-machine-linux inspect  \
-t 'administrator@vsphere.local:VMware123!@10.27.51.103'
INFO[2016-11-09T11:42:50Z] ### Inspecting VCH ####
INFO[2016-11-09T11:42:50Z]
INFO[2016-11-09T11:42:50Z] VCH ID: VirtualMachine:vm-1207
INFO[2016-11-09T11:42:51Z]
INFO[2016-11-09T11:42:51Z] Installer version: v0.6.0-4890-4f98611
INFO[2016-11-09T11:42:51Z] VCH version: v0.6.0-4890-4f98611
INFO[2016-11-09T11:42:51Z]
INFO[2016-11-09T11:42:51Z] VCH upgrade status:
INFO[2016-11-09T11:42:51Z] Installer has same version as VCH
INFO[2016-11-09T11:42:51Z] No upgrade available with this installer version
INFO[2016-11-09T11:42:51Z]
INFO[2016-11-09T11:42:51Z] vic-admin portal:
INFO[2016-11-09T11:42:51Z] https://10.27.51.18:2378
INFO[2016-11-09T11:42:51Z]
INFO[2016-11-09T11:42:51Z] DOCKER_HOST=10.27.51.18:2376
INFO[2016-11-09T11:42:51Z]
INFO[2016-11-09T11:42:51Z] Connect to docker:
INFO[2016-11-09T11:42:51Z] docker -H 10.27.51.18:2376 --tls info
INFO[2016-11-09T11:42:51Z] Completed successfully
[ /workspace/vic ]#

The docker API endpoint is highlighted in red above. You will also need the public certificate and private key to authenticate to the VCH from Admiral. This information is found in the directory where you initially deployed the VCH using vic-machine-*, and by default will be called virtual-container-host-cert.pem and virtual-container-host-key.pem. The names will be different if you used a non-default name for the VCH.

With this information, we can now go ahead and add this VCH as a host to Admiral. Back in the Admiral UI, click on Add Host, and enter the IP address of the docker API endpoint, as well as the port (2376). In the placement zone section, simply select the default placement zone. In the login credentials section, select new credentials, change the type from user to certificate, and add the public certificate and private key contents to the appropriate sections, as shown here:

vch-credentials-in-admiralClick on the blue check associated with the credentials, and it should temporarily go green to show success. Finally, click on Add to complete the addition of this Virtual Container Host (VCH) to Admiral. That completes the VIC integration part. You should now be able to deploy “containers as VMs” to that VCH/docker API endpoint. If you go to the Templates view in Admiral, you should see a bunch of container templates that are ready to deploy. These templates are from the default docker hub repository, which is pre-configured with Admiral. You can verify that everything is working by selecting any of those containers and provisioning it:

admiral-provision-requestsWhen the provisioning completes, and is hopefully successful, you can check the status of the deployed container via  the docker CLI, or the vSphere web client.

[ /workspace/vic ]# docker -H 10.27.51.18:2376 --tls ps -a
CONTAINER ID IMAGE COMMAND CREATED STATUS PORTS NAMES
ef98ebbbe9c3 library/nginx:latest "nginx -g daemon off;" 5 minutes ago \
Running nginx-mcm136_27086590482
6c8d6a4add24 ubuntu "bash" 7 days ago Exited (0) insane_einstein
[ /workspace/vic ]#

vch-containersExcellent. That is the orchestration framework taken care of. And of course, you can add multiple VCH instances as hosts if you so wish. Lets now see if we can use Project Harbor as a repository, instead of the docker hub one, or maybe with the docker hub repository.

3. Orchestrate container deployments from Harbor to VIC via Admiral

In the Templates view in Admiral, click on the “Manage Registries” button. This should show the default registry, which is of course docker hub. That is where all the templates that you observed previously were available from. Now click on the +Add button, and we will add a registry from our Harbor deployment.

add-harbor-repoNow you can see that I have both docker hub, and my own Harbor repro. I can now search for templates in both repos by simply typing in the name of a desired container. I have a container called cormac-nginx, and if I search on that, Admiral will only display those containers/templates which match.

matching-templatesAnd just like before, you can use Admiral to provision that template from Harbor down to the VCH, allowing for full integration between Admiral (Orchestration), Harbor (Repository) and VIC (Docker API endpoint with “containers as VMs”). Nice.

You can learn more about Admiral, and even contribute to it, via Github.

The post More CNA goodness from VMware – Introducing Admiral appeared first on CormacHogan.com.

Kubernetes on vSphere

$
0
0

kubernetesI’ve talked a lot recently about the various VMware projects surrounding containers, container management, repositories, etc. However one of the most popular container cluster managers is Kubernetes (originally developed by Google). To use an official description, Kubernetes (or K8S for short) is a “platform for automating deployment, scaling, and operations of application containers across clusters of hosts”. So this begs the question about how easy is it to deploy K8S on vSphere. I have already documented how K8S can be deployed on Photon Platform. But can you easily deploy Kubernetes on a vSphere infrastructure. The answer now is that it is relatively easy. This necessary scripts are now included in K8S version 1.4.5, which went live recently (October 29th). Let’s look at the steps involved in deploying Kubernetes on vSphere in more detail.

 Step 1. Deploy from where?

The first decision is to figure out where to deploy K8S from. In this example, I am going to roll out a VMware Photon OS VM, and use that as a way to deploy K8S to my vSphere infrastructure. Photon OS can be downloaded as an OVA from here. I used the HW11 version. However you could also deploy this from a laptop or desktop if you so wish.

My infrastructure is 3 hosts running ESXi 6.0u2, managed by a vCenter which is also running 6.0u2. I also have vSAN enabled to provide highly available persistent storage to the hosts.

Step 2. Setting up Photon OS

When you first open an SSH to the Photon OS, you will need to provide the default password of “changeme” and set a new password. There are a number of items that you need to add if you deploy the minimal Photon OS OVA like I have just done.

  • Go – Go programming language
  • govc – CLI for interacting with VMware vSphere APIs via Go
  • awk – parsing utility used by K8S scripts
  • tar – needed to extract K8S tar ball

2.1 Go

These are the steps to install Go in your Photon OS VM:

root@photon-qBvwmMUFl [ ~ ]# tdnf install go

Installing:
mercurial x86_64 3.7.1-3.ph1 31.10 M
go x86_64 1.6.3-1.ph1 219.92 M

Total installed size: 251.02 M
Is this ok [y/N]:y

Downloading:
go 57584085 100%
mercurial 9025599 100%
Testing transaction
Running transaction

Complete!
root@photon-qBvwmMUFl [ ~ ]# go version
go: cannot find GOROOT directory: /usr/bin/go
root@photon-qBvwmMUFl [ ~ ]# mkdir -p $HOME/go
root@photon-qBvwmMUFl [ ~ ]# GOROOT=$HOME/go
root@photon-qBvwmMUFl [ ~ ]# export GOROOT
root@photon-qBvwmMUFl [ ~ ]# go version
go version go1.6.3 linux/amd64
root@photon-qBvwmMUFl [ ~ ]#

I would recommend creating a .bash_profile and adding the GOROOT setting. You will need to add other exports shortly, and this will persist them.

2.2 govc

The govc binary can be downloaded from github:

root@photon-qBvwmMUFl [ ~ ]# curl -OL \
 https://github.com/vmware/govmomi/releases/download/v0.8.0/govc_linux_amd64.gz
 % Total % Received % Xferd Average Speed Time Time Time Current
 Dload Upload Total Spent Left Speed
100 595 0 595 0 0 1129 0 --:--:-- --:--:-- --:--:-- 1131
100 7861k 100 7861k 0 0 384k 0 0:00:20 0:00:20 --:--:-- 490k
root@photon-qBvwmMUFl [ ~ ]# gzip -d govc_linux_amd64.gz
root@photon-qBvwmMUFl [ ~ ]# chmod +x govc_linux_amd64
root@photon-qBvwmMUFl [ ~ ]# mv govc_linux_amd64 /usr/local/bin/govc
root@photon-qBvwmMUFl [ ~ ]# govc version
govc 0.8.0
root@photon-qBvwmMUFl [ ~ ]#

2.3 awk and tar

First, we find out which package and repo provides awk, and then install it. Tar can be installed as shown below.

root@photon-qBvwmMUFl [ ~ ]# tdnf whatprovides awk
gawk-4.1.3-2.ph1.x86_64 : Contains programs for manipulating text files
Repo     : photon
root@photon-qBvwmMUFl [ ~ ]# tdnf install gawk

Installing:
mpfr                   x86_64            3.1.3-2.ph1                501.48 k
gawk                   x86_64            4.1.3-2.ph1                  1.89 M

Total installed size: 2.38 M
Is this ok [y/N]:y

Downloading:
gawk                                    790862    100%
mpfr                                    228844    100%
Testing transaction
Running transaction

Complete!
root@photon-qBvwmMUFl [ ~ ]# tdnf install tar

Installing:
tar                    x86_64            1.28-2.ph1                  4.25 M

Total installed size: 4.25 M
Is this ok [y/N]:y

Downloading:
tar                                    1215034    100%
Testing transaction
Running transaction

Complete!
root@photon-qBvwmMUFl [ ~ ]# 

Step 3. Get Kubernetes and a VMDK image for VMs that will run K8S

There are now two components to pull into our Photon OS that will be required for the K8S deployment. The first is Kubernetes itself, and the second is a VMDK image that will be used to create the Virtual Machines that will run our K8S. These are both going to take a little time due to their sizes.

3.1 Download K8S

root@photon-qBvwmMUFl [ ~ ]# curl -OL \
https://storage.googleapis.com/kubernetes-release/release/v1.4.5/kubernetes.tar.gz
 % Total % Received % Xferd Average Speed Time Time Time Current
 Dload Upload Total Spent Left Speed
100 1035M 100 1035M 0 0 509k 0 0:34:43 0:34:43 --:--:-- 468k
root@photon-qBvwmMUFl [ ~ ]#

3.2 Extract Kubernetes

root@photon-qBvwmMUFl [ ~ ]# tar zxvf kubernetes.tar.gz
kubernetes/
kubernetes/server/
kubernetes/server/kubernetes-server-linux-amd64.tar.gz
..
.
kubernetes/README.md
root@photon-qBvwmMUFl [ ~ ]#

3.3 Download the VMDK image

root@photon-qBvwmMUFl [ ~ ]# curl --remote-name-all \
https://storage.googleapis.com/govmomi/vmdk/2016-01-08/kube.vmdk.gz
 % Total % Received % Xferd Average Speed Time Time Time Current
 Dload Upload Total Spent Left Speed
100 663M 100 663M 0 0 338k 0 0:33:25 0:33:25 --:--:-- 258k
root@photon-qBvwmMUFl [ ~ ]#

3.4 Unzip the VMDK image

root@photon-qBvwmMUFl [ ~ ]# gunzip kube.vmdk.gz

Step 4. Setup GO

The next step is to set up a bunch of Go environment variables, so that “govc” runs against your correct environment. Once again, it might be easier to add these to your .bash_profile. I have provided the list of variables specific for my environment here, but you will need to modify them to reflect your setup.

GOVC_URL='10.27.51.103'
GOVC_USERNAME='administrator@vsphere.local'
GOVC_PASSWORD='*****'
GOVC_NETWORK='VM Network'
GOVC_INSECURE=1
GOVC_DATASTORE='vsanDatastore'
GOVC_RESOURCE_POOL='/CNA-DC/host/Mgmt/Resources'
GOVC_GUEST_LOGIN='kube:kube'
GOVC_PORT='443'
GOVC_DATACENTER='CNA-DC'

export GOVC_URL GOVC_USERNAME GOVC_PASSWORD GOVC_NETWORK GOVC_INSECURE \
GOVC_DATASTORE GOVC_RESOURCE_POOL GOVC_GUEST_LOGIN GOVC_PORT GOVC_DATACENTER

There is not too much explaining needed here I think. You will need to provide the correct vCenter password obviously. The resource pool definition is a bit obtuse, but suffice to say that “Mgmt” is the name of my cluster, and the Resource Pool path has to take the format shown here. I am also using vSAN, and so have provided the vsanDatastore as the datastore on which to deploy the VMs that will run K8S. Finally, kube:kube are the credentials associated with the image that we previously downloaded.

Remember to run “source .bash_profile” when you have added these entries.

Step 5. Push the kube.vmdk image to the datastore

Now we use govc to move the kube.vmdk image to the vsanDatastore. We are placing it in the ./kube folder. Afterwards, we list the contents of the folder to make sure it is there.

root@photon-39BgfUQRO [ ~ ]# govc import.vmdk kube.vmdk ./kube/
[09-11-16 16:36:13] Uploading... OK
[09-11-16 16:36:49] Importing... OK
root@photon-39BgfUQRO [ ~ ]# govc datastore.ls ./kube/
kube.vmdk
root@photon-39BgfUQRO [ ~ ]#

You should also be able to navigate to the datastore view in the vSphere UI, and find the VMDK image in the kube folder, as shown here:

k8s-on-vsphere-1Step 6. Create an SSH identity

You need to have an SSH identify to deploy Kubernetes using the “kube-up.sh” method that we are going to use in a moment. These steps show you how to do this.

root@photon-39BgfUQRO [ ~ ]# ssh-keygen -t rsa -b 4096 -C "id"
Generating public/private rsa key pair.
Enter file in which to save the key (/root/.ssh/id_rsa):
Enter passphrase (empty for no passphrase):
Enter same passphrase again:
Your identification has been saved in /root/.ssh/id_rsa.
Your public key has been saved in /root/.ssh/id_rsa.pub.
The key fingerprint is:
SHA256:r7pDWeuz8+wFENryhHtr4/+b/Nx3plHzLaVgScKpDX8 id
The key's randomart image is:
+---[RSA 4096]----+
|        .        |
|       + o .     |
|      + = + .    |
|       =.* o .   |
|      .oS.+ E  .o|
|      o..o + . ++|
|     . .+ . . + o|
|      .o++ o o ++|
|      o++B=.=o+o+|
+----[SHA256]-----+
root@photon-39BgfUQRO [ ~ ]# eval $(ssh-agent)
Agent pid 666
root@photon-39BgfUQRO [ ~ ]# ssh-add ~/.ssh/id_rsa
Identity added: /root/.ssh/id_rsa (/root/.ssh/id_rsa)
root@photon-39BgfUQRO [ ~ ]#

Step 7. Roll out Kubernetes using kube-up

We are now ready to deploy K8S. Change directory to the Kubernetes extracted folder, and then run the following command. You need KUBERNETES_PROVIDER set to vsphere, and the kube-up.sh script is in the cluster sub-folder. This is all on the same command line by the way (it is wrapped here just for neatness).

root@photon-39BgfUQRO [ ~/kubernetes ]# KUBERNETES_PROVIDER=vsphere \
cluster/kube-up.sh
... Starting cluster using provider: vsphere
... calling verify-prereqs
... calling kube-up
.
.

I am not going to reproduce all the output here, but what you should observe is a master VM and 4 minion VMs getting deployed.

k8s-on-vsphere-2You will also see references to K8S being configured via “Salt”, or SaltStack. Salt is a Python-based open-source configuration management software and remote execution engine. Supporting the “Infrastructure as Code” approach to deployment and cloud management, it competes primarily with Puppet, Chef, and Ansible.

If the deployment is successful, you should observer the final output as follows:

.
.
Found 4 node(s).
NAME                  STATUS    AGE
kubernetes-minion-1   Ready     3m
kubernetes-minion-2   Ready     3m
kubernetes-minion-3   Ready     3m
kubernetes-minion-4   Ready     3m
Validate output:
NAME                 STATUS    MESSAGE              ERROR
scheduler            Healthy   ok
controller-manager   Healthy   ok
etcd-1               Healthy   {"health": "true"}
etcd-0               Healthy   {"health": "true"}
Cluster validation succeeded
Done, listing cluster services:

Kubernetes master is running at https://10.27.51.41

To further debug and diagnose cluster problems, use 'kubectl cluster-info dump'.

Step 8. Launch the Kubernetes UI

As shown above, you should now be able to connect to the master on whatever IP address is reported in the output. If you append /ui to the URL, and login as “admin”, you should see something like this shown below. To get the admin password, you can find it in the ~/.kube/config file:

root@photon-39BgfUQRO [ ~/kubernetes ]# cat ~/.kube/config | grep password

k8-uiAnd there you have it – Kubernetes running on vSphere. In an upcoming post, I’ll include a useful demo which will demonstrate some of K8S features when running on vSphere, especially around persistent and dynamic volumes. But for now, you can hand this off to your developers to get started with K8S.

To shutdown K8S and remove the VMs, simply run “kube-down.sh”:

root@photon-39BgfUQRO [ ~/kubernetes ]# KUBERNETES_PROVIDER=vsphere \
cluster/kube-down.sh

Further reading

There is some additional reading on deploying Kubernetes with vSphere here.

The post Kubernetes on vSphere appeared first on CormacHogan.com.
Deploy Kubernetes as a service on Photon Controller v1.1

$
0
0

PHOTON_square140Now that we have seen how to deploy Photon Controller v1.1 with vSAN, we will look at another new feature of this version of Photon Controller. At VMworld 2016 in Barcelona, Kit Colbert mentioned that one of the upcoming features of Photon Controller is the ability to deploy Kubernetes As A Service on top of Photon Controller. In this post, we will look at that feature, but also how to deploy the Kubernetes VMs (master, etcd, workers). While we have been able to deploy K8S on Photon Controller in previous releases, this version 1.1 simplifies that process greatly, as you will see shortly.

I am not going to go through the process of deploying Photon Controller in this post. You can read up on how to do that in previous posts that I created, such as this one here. Instead, we will assume that Photon Controller has been deployed, and that we now have access to the UI in order to deploy Kubernetes As A Service.

There are a number of distinct steps to follow:

  1. Create tenant and resource ticket
  2. Create project
  3. Upload the K8S 1.4.3 image (available from Photon Controller v1.1 on github)
  4. Create a cluster

However, not everything can be done from the UI at this point in time. There is 1 step that must be done from photon controller CLI. That is to create a default network. The commands are shown below. Talking with some of the team, this feature will be in an updated version of the UI.

root@photon-full-GA-1 [ ~ ]# photon -n network create --name dev-network \
--portgroups "VM Network" --description "Dev Network for VMs"
8564797254208b59300fa

root@photon-full-GA-1 [ ~ ]# photon -n network set-default 8564797254208b59300fa
8564797254208b59300fa

root@photon-full-GA-1 [ ~ ]# photon network list
Using target 'http://10.27.51.117:28080'
ID                     Name         State  PortGroups    Descriptions         IsDefault
8564797254208b59300fa  dev-network  READY  [VM Network]  Dev Network for VMs  true
Total: 1

root@photon-full-GA-1 [ ~ ]#

Note that this only needs to be done one time. Multiple K8S deployments can now be rolled out from the UI using the same default network if necessary. With that step completed, we can now do the rest of the deployment from the UI.

Step 1 – Create a new tenant and resource ticket

1-tenantStep 2 – Create a new project

2-projectStep 3 – Upload the K8s image, and mark it for K8s

3-image-uploadMarking the image as Kubernetes is done from the actions drop-down menu. Once marked, it should show up as K8s in the “Type” field:5-6-image-marked-for-k8sStep 4 – Create the cluster

There are few distinct steps in creating the cluster. The first is to provide a name for the cluster. The type is then set to Kubernetes.

10-cluster1Next, network details such as DNS, gateway and netmask must be provided.11-cluster2Information specific to the K8s master and etcd VMs is provided in the Kubernets Cluster Settings, which is the next step. Included is the range of IP addresses that containers will use for communicate. I have not included any SSH key or cert info in this example:12-cluster-3Next, we must select the flavor and network. This is the default network that we created previously. Photon Controller v1.1 also comes with a set of built-in flavors for VMs and disk. At this point in time, there is no way to select a disk flavor, but once again, I am informed by the team that this will be included in a future version of the UI.

13-cluster-defaultsFinally, we come to the summary tab. You can verify the settings here before clicking on Finish. That completes the setup. When the cluster is deployed, a link will be shown which will allow you to launch the Kubernetes dashboard.14-cluster5Resizing the cluster

It is very easy to resize the number of workers in the K8S cluster from the Photon Controller UI. In this deployment, we started with a single worker. Below, on the Kubernetes dashboard (which can be launched directly from the Photon Controller UI), in the nodes view, we can see the master and single worker.

20-k8s-nodesWe can now roll-out additional workers by resizing the cluster from Photon Controller. We are going to scale from 1 worker to 5 workers: 21-resizeThis operation is very quick. Soon after initiating the resize, we now see 5 workers in the K8S dashboard:22-k8s-nodesSo hopefully this gives you some idea on how to utilize Kubernetes as a Service on Photon Controller version 1.1. We continue to see great improvements with every release of Photon Controller, but I think the ability to be able to deploy orchestration frameworks/clusters like K8S is a great feature. Yes, there are some enhancements to be made still (for example, networking and flavors, which were not ready in time for this release) but these are well understood as outstanding issues and should also appear in time.

The one thing that is not possible via the UI is the ability for K8S to consume vSAN storage (as there is no way to specify a disk flavor in this version). In an post that I plan to publish tomorrow, I will show how K8s can be deployed to consume vSAN storage via the photon controller CLI.

The post Deploy Kubernetes as a service on Photon Controller v1.1 appeared first on CormacHogan.com.

Viewing all 78 articles
Browse latest View live