Image may be NSFW.
Clik here to view. While we are always looking at what other data services vSAN could provide natively, at the present moment, there is no native way to host S3 compatible storage on vSAN. After seeing the question about creating an S3 object store on vSAN raised a few times now, I looked into what it would take to have an S3 compatible store running on vSAN. A possible solution, namely Minio, was brought to my attention. While this is by no means an endorsement of Minio, I will admit that it was comparatively easy to get it deployed. Since the Minio Object Store seemed to be most easily deployed using docker containers, I leveraged VMware’s own Project Hatchway – vSphere Docker Volume Service to create some container volumes on vSAN, which are in turn utilized by the Minio Object Storage. Let’s look at the steps involved in a bit more detail.
i) Deploy a Photon OS 2.0 VM onto the vSAN datastore
Note that I chose to use Photon OS, but you could of course use a different OS for running docker if you wish. You can download the Photon OS in various forms here. This Photon OS VM will run the containers that make up the Minio application and create the S3 Object Store. I used the photon-custom-hw11-2.0-31bb961.ova as there seem to be some issues with the hw13 version. William Lam described them here in his blog post. Once deployed, I enabled and started the docker service.
My next step is to get the vSphere Docker Volume Service (vDVS) up and running so that I can build some container volumes for Minio to consume.
ii) Installing the vSphere Docker Volume Service on ESXi hosts
All the vDVS software can be found on GitHub. This is part of Project Hatchway, which also include a Kubernetes vSphere Cloud Provider. We won’t be using that in this example. We’ll be sticking with the Docker Volume Service.
Deploying vDVS is a two stage installation process. First, a VIB must be deployed on each of the ESXi hosts in the vSAN cluster. This can be done in a number of ways (even via esxcli), but I chose to do it via VUM, the vSphere Update Manager. First, I downloaded the zip file (patch) locally from GitHub, and then from the VUM Admin view in the vSphere client, I uploaded the patch via the Manage > Settings > Download Settings > Import Patches, like I am showing here:
Image may be NSFW.
Clik here to view.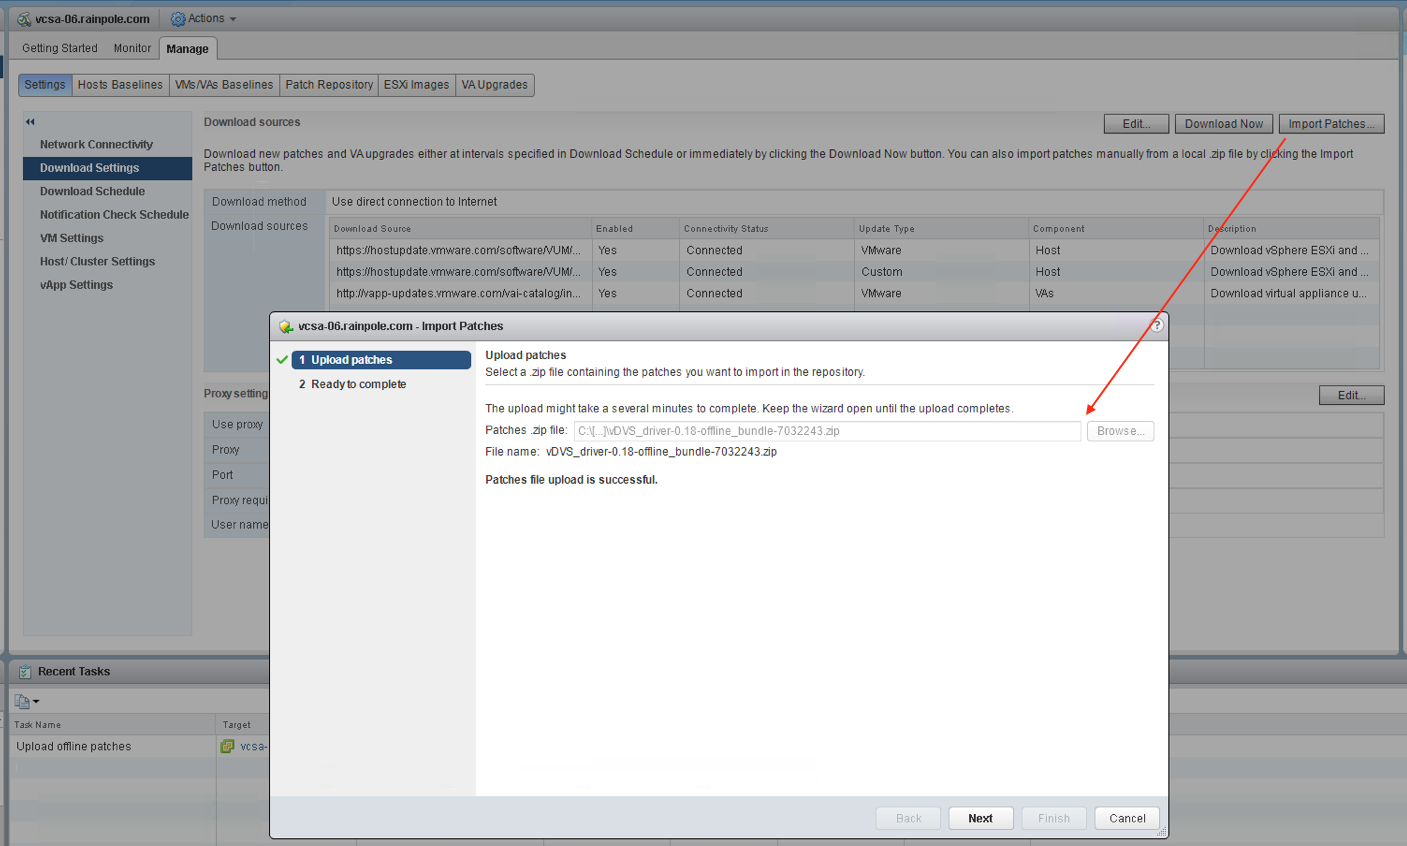
Next, from the VUM > Manage > Host Baselines view, I added a new baseline of type Host Extension and selected my newly uploaded VIB, called vDVS_Driver Bulletin:
Image may be NSFW.
Clik here to view.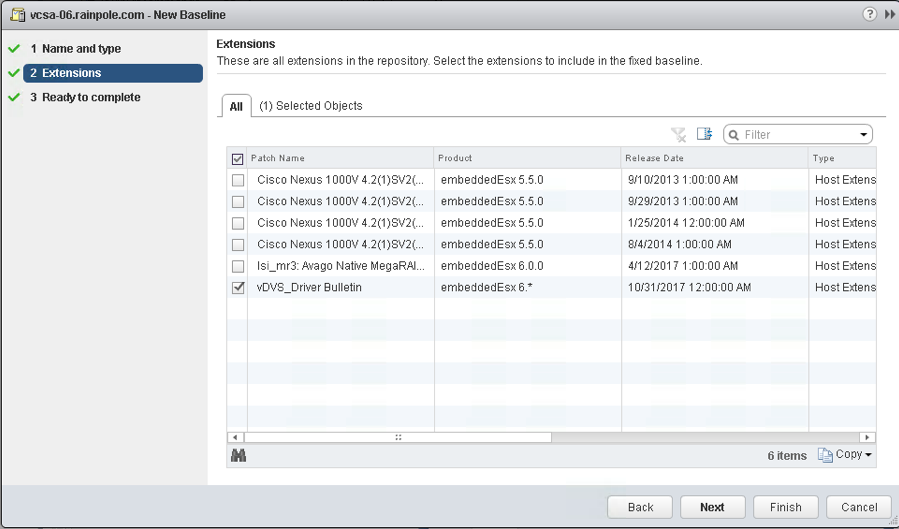
When the baseline has been created, you need to attach it. Switch over to the VUM Compliance View for this step. The baselines should now look something like this:
Image may be NSFW.
Clik here to view.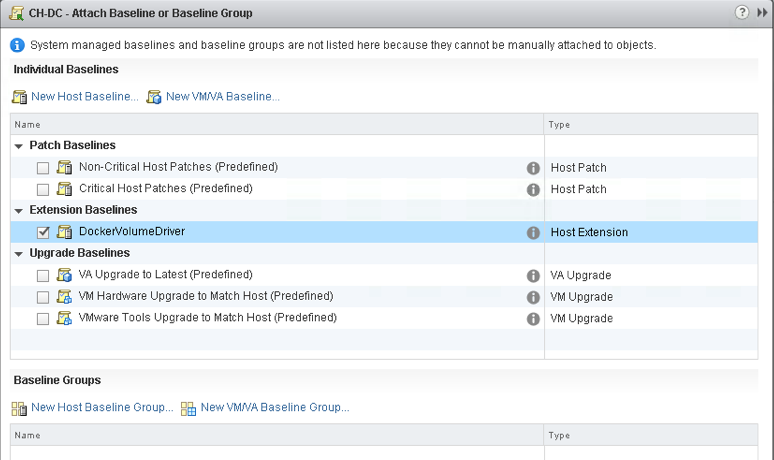
Once the baseline is attached to the hosts, click on Remediate to deploy the VIB on all the ESXi hosts:
Image may be NSFW.
Clik here to view.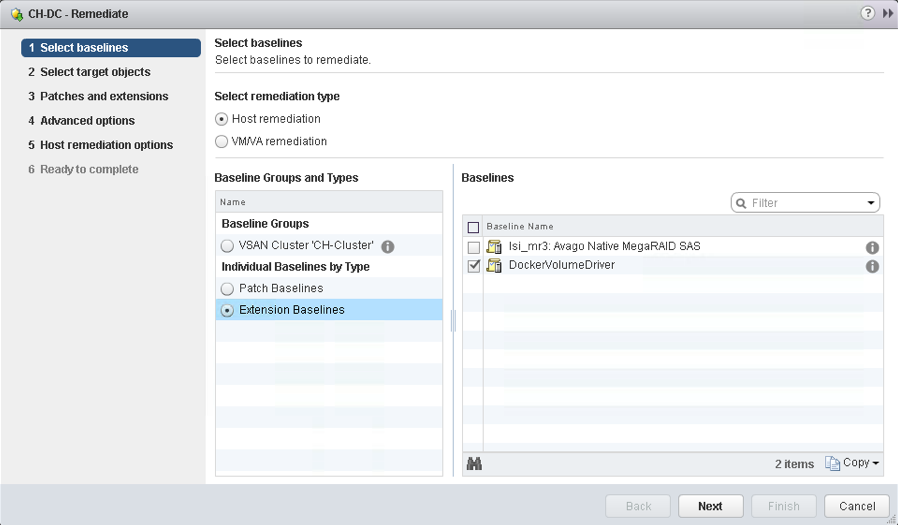
Finally, when the patch has been successfully installed on all hosts, the status should look something like this:
Image may be NSFW.
Clik here to view.
The DockerVolumeDriver extension is compliant. And yes, I know I need to apply a vSAN patch (the Non-Compliant message). I’ll get that sorted too Image may be NSFW.
Clik here to view. Now that the vDVS has been installed on all of my ESXi hosts in my vSAN cluster, let’s install the VM component, or to be more accurate, the Container Host component, since my Photon OS VM is my container host.
iii) Installing the vSphere Docker Volume Service on the Container Host/VM
This is just a single step that needs to be run on the Photon OS VM (or on your Container Host of choice):
And we’re done.
iv) Creating Storage Polices for Docker Volumes
The whole point of installing the vSphere Docker Volume Driver is so that we can create individual VMDKs with different data services and different level of performance and availability on a per container volume basis. Sure, we could have skipped this and deployed all of our volumes locally on the Container Host VM, but then the data is not persisted when the application is stopped. Using the vDVS approach, we can have independent VMDKs per volume to persist the data. Even if the application is stopped and restarted, we can reuse the same volumes and our data is persisted.
As this application is being deployed on vSAN, let’s create some storage policies to begin with. Note that these have to be done from the ESXi host as vDVS cannot consume policies created via the vCenter Server at present. So how is that done?
Here is an example of creating a RAID-5 policy via the ESXi command line. Note that the “replicaPreference” set to “Capacity” is how we select Erasure Coding (RAID-5/6). The “hostFailuresToTolerate” determines if it is RAID-5 or RAID-6. With a value of 1, this is RAID-5 policy. If “hostFailuresToTolerate” is set to 2, this would be a RAID-6 policy. As I only have 4 hosts, I am limited to implementing RAID-5, which is a 3+1 (3 data + 1 parity) configuration, and requires 4 hosts. RAID-6 is implemented as a 4+2 and requires 6 hosts. Note the use of single and double quotes in the command:
OK – the policy is now created. The next step is to create some volumes for our Minio application to use.
v) Create some container volumes
At this point, I log back into my Photon OS/Container Host. I am going to build two volumes, one to store my Minio configuration, and the other will be for my S3 buckets. I plucked two values out of the air, 10GB for my config (probably overkill) and 100GB for my S3 data store. These are the commands to create the volumes, run from within the container host/photon OS VM.
S3Config
DRIVER VOLUME NAME
local 4bdbe7494bc9d27efe3cc10e16d08d3c7243c376aaff344990d3070681388210
vsphere:latest S3Buckets@vsanDatastore
vsphere:latest S3Config@vsanDatastore
Now that we have our volumes, let’s deploy the Minio application.
vi) Deploy Minio
Deploying Minio is simple, as it comes packaged in docker. The only options I needed to add are the volumes for the data and the configuration, specified with the -v option:
root@photon-machine [ ~ ]# docker run -p 9000:9000 –name minio1 -v “S3Buckets@vsanDatastore:/data” -v “S3Config@vsanDatastore:/root/.minio” minio/minio server /data
Endpoint: http://172.17.0.2:9000 http://127.0.0.1:9000
AccessKey: xxx
SecretKey: yyy
Browser Access:
http://172.17.0.2:9000 http://127.0.0.1:9000
Command-line Access: https://docs.minio.io/docs/minio-client-quickstart-guide
$ mc config host add myminio http://172.17.0.2:9000 xxx yyy
Object API (Amazon S3 compatible):
Go: https://docs.minio.io/docs/golang-client-quickstart-guide
Java: https://docs.minio.io/docs/java-client-quickstart-guide
Python: https://docs.minio.io/docs/python-client-quickstart-guide
JavaScript: https://docs.minio.io/docs/javascript-client-quickstart-guide
.NET: https://docs.minio.io/docs/dotnet-client-quickstart-guide
Drive Capacity: 93 GiB Free, 93 GiB Total
Minio is now up and running.
vii) Examine the configuration from a browser
Let’s create an S3 bucket. The easiest way is to point a browser at the URL displayed in the output above, and do it from there. At the moment, as you might imagine, there is nothing to see but at least it appears to be working. The icon on the lower right hand corner allows you to create buckets.
Image may be NSFW.
Clik here to view.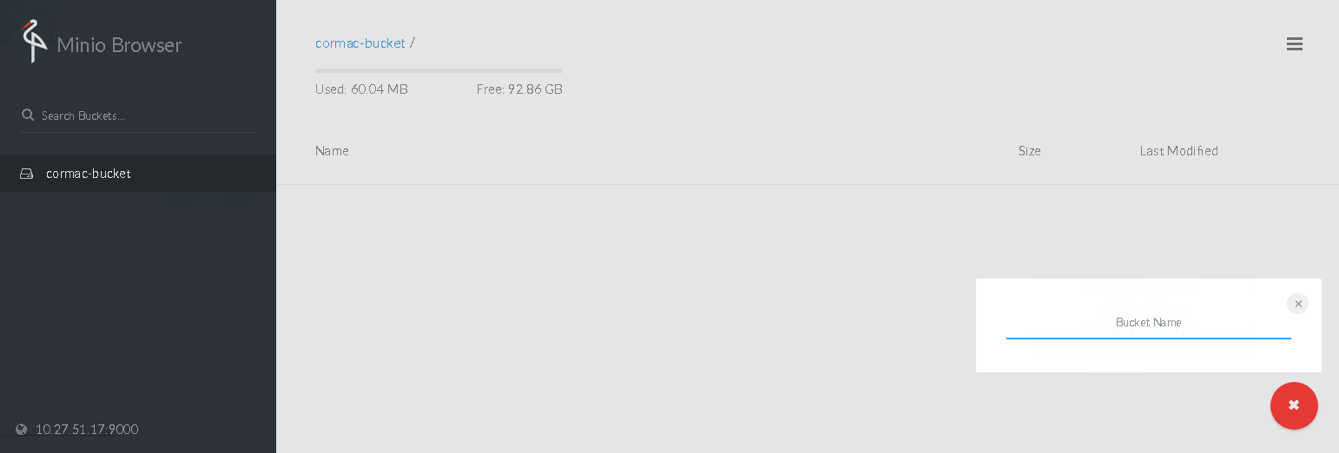
viii) Check out the VMDKs/Container Volumes on the vSAN datastore
If you remember, we requested that the container volumes get deployed with a RAID-5 policy on top of vSAN. Let’s see if that worked:
Image may be NSFW.
Clik here to view.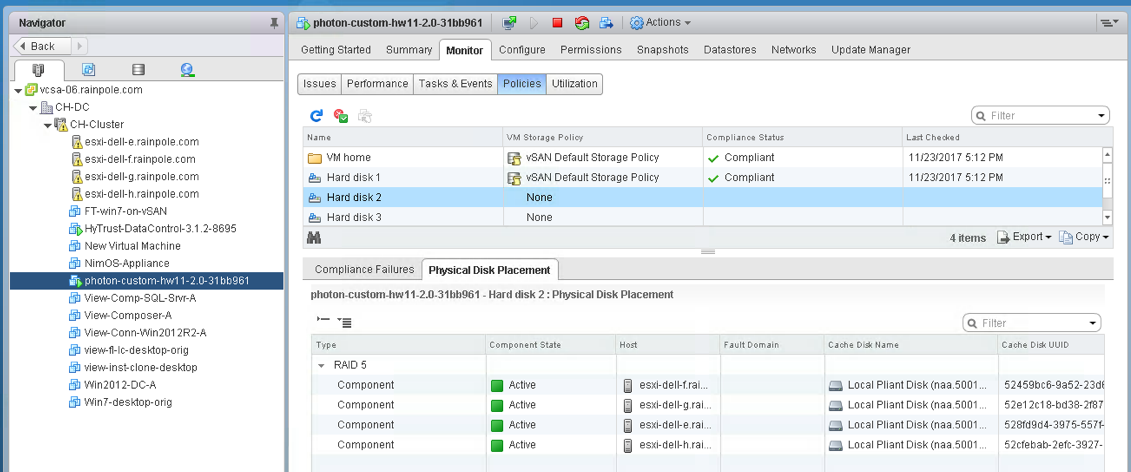
It appears to have worked perfectly. You can see the component placement for Hard Disk 2 (Config) is a RAID-5 by checking the Physical Disk Placement view. The same is true for Disk 3 (S3 Buckets) although it is not shown here. The reason for the VM Storage Policy showing up as None is that these policies were created at the host level and not the vCenter Server level. OK – lets push some data to the S3 store.
ix) Push some data to the S3 object store
I found a very nice free S3 Browser from NetSDK LLC. Once again, I am not endorsing this client, but it seems to work well for my testing purpose. Using this client, I was able to connect to my Minio deployment and push some data up to it. All I did was push the contents of one of my desktop folders up to the Minio S3 share. It worked quite well. He is a view from the S3 Browser of some of the data that I pushed:
Image may be NSFW.
Clik here to view.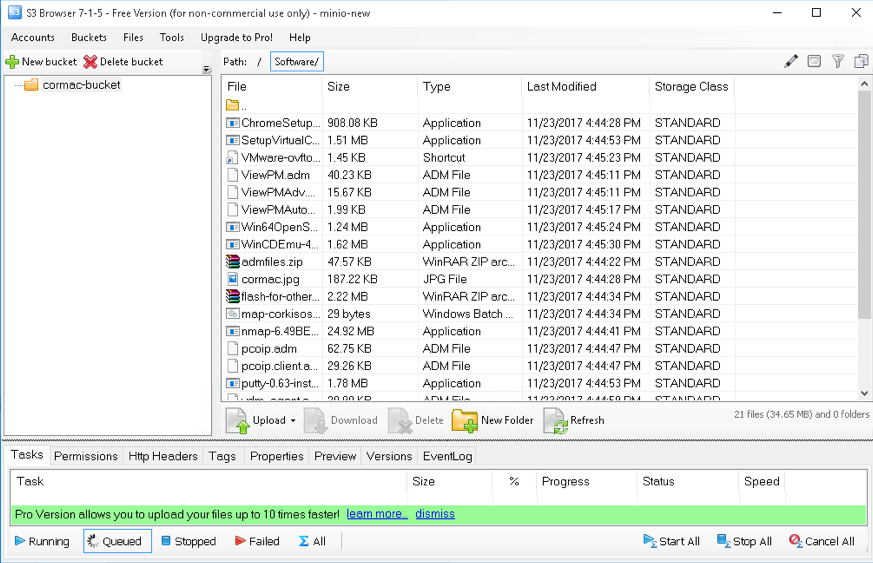
And just to confirm that it was indeed going to the correct place, I refreshed on the web browser to verify:
Image may be NSFW.
Clik here to view.
Minio also has a client by the way. This is deployed as a container, and you can also connect to the buckets, display contents, and do other stuff:
Conclusion
If you just want to get something up and running very quickly to evaluation an S3 on-prem object store running on top of vSAN, Minio alongside the vSphere Docker Volume Server (vDVS) will do that for you quite easily. I’ll caveat this by saying that I’ve done no real performance testing or comparisons at this point. My priority was simply trying to see if I could get something up and running that provided an S3 object store, but which could also leverage the capabilities of vSAN through policies. That is certainly achievable using this approach.
I’m curious if any readers have used any other solutions to get an S3 object store on vSAN. Was it easier or more difficult than this approach? I’m also interested in how if performs. Let me know.
One last thing to mention. Our team has also tested this out with the Kubernetes vSphere Cloud Provider (rather than the Docker Volume Service shown here). So if you want to run Minio on top of Kubernetes on top of vSAN, you can find more details here.
The post A closer look at Minio S3 running on vSAN appeared first on CormacHogan.com.